30/04/2011

Dream


I found another shape to use as a base card whilst flicking through the Child's Year cartridge. There are quite a few cards on the cart but I love the scalloped oval on the monogram feature (I use it all the time!) and tried a few sizes before settling on one to make a base card with. I cut two scalloped ovals at 8" and joined them together at the top. This shape doesn't nest so I settled for plain ovals for the mats. I cut another 8" scalloped oval from green paper but it didn't cut too well- a few of the scallops were snagged- so I went around the edges with a green inkpad after it was glued to the card base, and I'm really pleased with finished result. I used freebie NitWits papers from Creative Cardmaking for the oval mat. I cut a birdcage and stand from silver mirri and glossy white card. The birdcage was attached to the stand with a dab of PVA then the complete stand was adhered to the front of the card over a punched ribbon trimmed border. The top of the birdcage was embellished with some teeny WOC roses and a large Prima rose was adhered to the ribbon on the border. 'Dream' was cut from purple glittercard shadowed with green cardstock, then adhered to the bottom of the card with foam pads. A smattering of pearls completes the card.
Carts used:
Oval card base- A Child's Year
Oval mats-George
Birdcage & stand-Serenade
'Dream' sentiment-Stamping Solutions
Thanks for dropping by!
Heather xxx

29/04/2011

Will work for shoes!.....


Well, it's all over and what a day it was. Everything ran like clockwork and it was a fab day. Kate looked exquisite in her wonderful Grace Kelly-esque dress. She is truly princess material. How adorable were the bridesmaids? Oh and by the way MEDIA people.. Pippa is not a Maid(American)/Matron (UK) of Honour- you have to be married to be one of those! She's the Chief Bridesmaid. She did a grand job looking after those littlies that being said, and she looked wonderful in that column dress. What a contrast to the last Royal wedding. Simple, elegant and beautiful.
Our niece Anita shared the Royals' special day as it was her birthday today. She's sunning herself in Cuba. Happy Birthday Anita!
I used another SVG for this card. I cut the black background from embossed black mirri (it cut surprisingly well with no rips!) and the 'will work for shoes!' sentiment from cerise glittercard. The sentiment was adhered to the black mirri with PVA glue.
The card base is a shaped easel covered with freebie papers from Creative Cardmaking. The shoe icon was adhered with foam pads to a smaller panel on the top portion of the card. The bottom of the card holds the Birthday sentiment on a smaller shaped panel over a ribbon trimmed punched border. A bow, layered bloom and a smattering of pearls completes the card.
Carts used:
Shaped card base/shaped panels-Just Because Cards
Shoe SVG-Denise's Scrapbooking Room
Happy Birthday-Stamping Solutions
'ANITA'-Lyrical Letters
Thanks for dropping by today!
Heather xxx

27/04/2011

Lady DJ..........


Rumour has it that in a rather large residence in London,on Friday night, there's going to be a Big Wedding Bash...somebody important I believe. They'll raise the rafters, and the current residents are leaving for the night 'cos of the noise and all those young people running around. Maybe they'll have a lady DJ like the one on today's card.
The Big Day is almost here and I really hope that the morons who love to chuck a spanner in the works stay at home and leave everyone else to enjoy themselves.
Today's card is another shaped front card. I cut the lady DJ shadow from white card and used that as a template to cut the front of the card. The papers I used were from an old DCWV stack called Nana's Kitchen. The DJ was pieced from different colours of textured cardstock, patterned paper and plain & holographic mirri. A frame was cut from patterned paper to hold the 'Party Time' sentiment. A bloom was added to complete the card.
Carts used:
Lady DJ and frames-Formal Occasion
Party Time-Stamping Solutions
Thanks for dropping by!
Heather xxx

26/04/2011

Take A Bow........


Hi everyone! It's been a while since I posted a card, what with the Easter holiday and the GREAT weather ( when was it ever this hot at Easter?!!) the garden needing work, having both boys at home and prepping for a new round of workshops I've been bizzy, bizzy, bizzy! So now it's back to normal, for three days at least, then off again on Friday!
On to today's card. I used a shaped card (do I make any other kind these days?!) and papers from First Edition's Up, Up & Away 8x8 stack. The little tightrope walker was cut from blue glittercard, given a green glittercard paper-pieced bodice and a white shadow. She was adhered with foam pads onto an off-centre panel over a ribbon with bow. The sentiment was cut from more glittercard and shadowed in white, then adhered with foam pads beside the image. A layered bloom completes the card.
Carts used:
Card Base- Just Because Cards
Tightrope walker-Carousel
Sentiment-Quarter Note
Thanks for dropping by!
Heather xxx

21/04/2011

Prom dress......


As you must have guessed by now I love making shaped cards. This one is a little different in that the front of the card is shaped but the back remains a standard card shape. To make this card I cut the dress from patterned paper from the First Edition 'Spring Feast' 8x8 stack. I also cut a shadow which was covered with pink paper. I placed the shadowed dress so that it slightly overlapped the fold of the card and drew around it. I cut around the pencil line and then adhered the shadowed dress to the resulting shape. The patterned paper dress was then adhered to the front of the card,on top of the shadow, with foam pads.
The inside back of the card was covered edge-to-edge with pink paper and a smaller piece of patterned paper adhered on top. The sentiment was cut from green patterned paper and adhered to a scalloped oval, which was fixed to the front of the card to the side of the dress. A miniature corsage with bow adhered to the dress bodice, and a bloom on the sentiment oval completes the card.
Carts used:
Dress, sentiment and scalloped oval-Formal Occasion
Thanks for visiting on this glorious day!
Heather xxx

19/04/2011

C'est La Vie!........


There were some very scrumptious papers in the latest edition of Creative Cardmaking, by Craftwork Cards. They are French inspired and in a lovely palette of pink & grey. There are stripes, scripts & florals as well as a couple of sheets of silver pearlised paper. I used a couple of the script papers and a new shape for this card. I wanted a C5-ish sized card so I searched through my carts and found this shape in Storybook. I played around with the sizes until I got one that would fit a C5 envelope- this one was cut at 6 1/4". The shape was cut twice in white card then joined together along the top edge. Another piece was cut from paper and adhered to the card base. A smaller panel with a shadow was cut from white/pink script paper, wrapped with polka dot sheer ribbon, then adhered- slightly offset-with foam pads to the base card. I cut an Eiffel tower from pink pearlised card, embossed it with a swirl embossing folder, then adhered it to the side of the panel.The sentiment was cut from the same pearlised cardstock as the tower, shadowed in white, then adhered to the panel with foam pads. A smattering of bling was added to the tower, and a Prima bloom to the ribbon- et voila! Le/la (not sure which!) cart est fini!
Carts used:
Card base/layers-Storybook
Eiffel Tower/sentiment-Wall Decor & More
Thanks for dropping by!
Heather xxx

18/04/2011

Tea For Two!......


Fancy a cuppa? In a china cup from a real teapot, not a teabag in a mug! How about this pretty little tea set? It's cut from free Pink Petticoat papers and Dovecrafts 'Tea House' papers. The card base & layers were made with Tea House papers and the pot, cups & saucers were cut from the PP papers. I cut the teapot & cups three times- one card, and two different papers. The cut pieces were chopped about and re-assembled to create a two-tone look.The finished trio were adhered to the card front with foam pads. 'Tea for 2' was cut from pink glittercard shadowed with white textured cardstock and adhered to the smaller panel with foam pads. A ribbon, bow, daisy and a smattering of pearls completes the card.
Carts used:
Card base-Just Because Cards
Teapot, cups & saucers- A Child's Year
Sentiment-Nursery Rhymes
Thanks for dropping by!
Heather xxx

17/04/2011

Birthday Bonanza Weekend!.....


It's been a Birthday Bonanza weekend these last two days! One of the BoysNextDoor's 9th yesterday and today it's one of the GirlzNextDoor's 12th and our nephew Skanda's 17th (he lives in Sydney)..Phew!!! That's a lot of cards!
For Skanda I chose a game controller, using an XBox controller as a guide for the button colours, which are Card Candi. I cut it from grey and white cardstock, layering the grey on top of the white with foam pads. I pushed the Card Candi through the holes and fixed them in place with foam pads. I added a little detail with a dressmaker's wheel. The papers are old ones from my stash. I cut the '17' from beige cardstock with a blue outline, and cut both sentiments from blue cardstock with beige shadows. A smattering of Card Candi completes the front of the card.

The inside of the card was decorated with a plain, matted panel, the name and a smaller controller.

Sophie's card is suitably girly with a scalloped card base and papers from Pink Petticoat (from the same freebie used in yesterday's card) I covered the front of the card with patterned paper and added a polka dot paper circle shadowed with pink. The outfit was cut from more PP papers and adhered over a punched, ribbon trimmed border with foam pads. I added a metal 'happy birthday' tag to the coat hanger with a teeny safety pin. 'Sophie' was cut from yellow glittercard shadowed with pink, then adhered with foam pads. A pink daisy completes the card.
Carts used:
SKANDA'S card:
Controller- Father's Day Seasonal Cartridge
Game On-Sports Mania
Happy Birthday-Stamping Solutions
'17'-Calligraphy
SOPHIE'S card:
Card base-Wild Card (Doily card)
Outfit-Paisley
'Sophie'-All Mixed Up
Phew! I'm off for a lie down!
Thanks for looking!
Heather xxx

16/04/2011

Skaterboy!.......


Aneurin, one of the little BoyzNextDoor, is 9 today. I made this cute card for him using freebie Pink Petticoat papers from last months Creative Cardmaking.The layout is very simple (always a good philosophy when making male cards) using two patterned papers and an embossed panel, which holds this cute little skater guy who is attached with a Papermania spring. He was cut from white textured cardstock with a blue shadow. I paper-pieced his hat, jersey and skateboard which makes him a little more dimensional. I added an 'A' to the white panel of the jersey as I didn't have room to fit the full name on the card. 'Happy Birthday' was cut from blue cardstock and adhered to a white panel which was matted with pale/dark blue cardstock. The sentiment panel was adhered with foam pads below the skater.
Carts used:
Skater boy- Car Decals
Happy Birthday- A Child's Year
Thanks for dropping by today!
Heather xxx

14/04/2011

The perfect dress.....


Boy!... I've been a bad blogger! I haven't posted anything for three days. Slapped wrist!
Today's card (better late than never I suppose!) is another 'dressy' card. It's another shaped card made with papers from First Edition Spring Feast 8x8 stack. I only cut one layer for this card, and added a punched ribbon trimmed border. The dress was cut from pink floral papwer from the stack, then adhered over the border with foam pads. The sentiment was cut from patterned paper and adhered to a funky frame, which was embellished with a pink daisy and some pearls. The frame was adhered to the card with foam pads. A smattering of pearls on the dress and below the border completes the card.
Carts used:
Card frame and layers- Just Because Cards
Dress, sentiment & funky frame- Formal Occasion
Thanks for dropping by!
Heather xxx

11/04/2011

Fan-tastic!.......


Hi everyone! Hope you all had a great weekend enjoying the sunshine, but typically for the start of the Easter holidays it changes! I had a great day on Saturday at the Swarm. The atmosphere, as usual was very jovial & creative and some wonderful cards were produced- one day I'll ask my ladies if I can showcase some of their cards!
I thought that I'd show you a different shaped card today. When I saw this fan and that it had a shadow I knew that it would make a fan-tastic card (pardon the pun!) I cut the fan shadow out three times - twice in white card and once in pink paper. The two cardstock fans were adhered together across the top and the pink paper fan adhered to it to create a base card. The fan was cut from white textured cardstock which I embossed after cutting, and the patterned piece was cut from Papermania 'Summer Bloom' 12x12 paper. This was adhered flat to the white fan and then the whole thing was adhered to the fan card base with foam pads. The paper was so pretty that I didn't want to cover too much of it up, so I decided to make the focal point the handle of the fan which was embellished with WOC roses and cherry blossoms, pearl strands and a sheer ribbon bow. A scalloped circle with the 'Friends For Life' sentiment was adhered to the fan with foam pads. A pearl on each of the points of the fan completes the card.
Carts used:
Fan card base/Fan-Formal Occasions
Friends For Life-Stamping Solutions
Scalloped circle-Winter Woodland
Circle-George
Thanks for dropping by!
Heather xxx

08/04/2011

Ab Fab!......


Here's another card using that fab shape that I showcased yesterday. The card was cut at 7 1/2" with a 7" & 6 3/4" second layer. A smaller 3rd layer was cut at 5" & 4 3/4" (I think!) and wrapped with Bo-Bunny polka dot ribbon. The paper was from a DCWV 8x8 stack called Garden Party. The dress form was cut from silver mirri and the dress from more paper from the stack. The dress was adhered to the form with foam pads then adhered to the front of the card overlapping the smaller off-set panel. The 'Fabulous' jumbled word art was cut from the same paper that covers the base card, and adhered to the off-set panel with foam pads. A WOC cherry blossom and a smattering of pearls completes the card.
Carts used:
Shaped card- Just Because Cards
Dress Form-Nifty Fifties
Fabulous word art-Graphically Speaking (haven't used that one in a long while!!)
I'm hosting a Swarm tomorrow and looking forward to seeing my ladies.See you there!
Heather xxx

06/04/2011

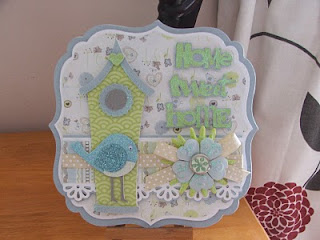
Home Tweet Home...New Shape!


Good Morning everyone!
I found another shape the other day to make a card base with, and me being me, went into overdrive making them left, right & centre! It's such a pretty shape and lends itself to so many occasions. In this instance, inspired by the paper, I decided to make a New Home card featuring a bird house.
I cut two of the shapes at 7 1/2" and adhered them together at the top (who needs a Gypsy/DS!) I cut another piece to fit the front from patterned paper from the Up, Up & Away stack from First Edition. I then cut another panel 1/2" smaller and then another 1/4" smaller than that. This shape nests perfectly, but not all shapes do, so you'd have to do a test cut on other shapes first.
I added a punched, ribbon trimmed border across the card, adhered with foam pads. The bird house was cut from plain card (as a base) and patterned paper, layered up and adhered over the border. The sweet birdie was cut from grey cardstock and blue glittercard, and I added a teeny googly eye. He was adhered with foam pads in front of the birdhouse. 'Home Tweet Home' and it's shadow were created with patterned paper. A layered bloom, patterned brad and a teeny punched heart completes the card.
Carts used:
Shaped card base- Just Because Cards (flower card)
Birdhouse- Stretch Your Imagination
Birdie-Simply Charmed
Home Tweet Home sentiment-Wall Decor & More
Thanks for dropping by!
Heather xxx

05/04/2011

Woops!!!...

Sorry Folks! In trying to delete an old site on my blog list I deleted the whole flippin' lot! I've re-instated most of them. If I've left any out let me know and I'll put 'em back in. Scroll down for today's post.
TTFN!
Heather

Just Because.......


Sorry for the quality of the photo!- I took it early yesterday morning and it wasn't quite light enough me thinks!
There's not a 'real' flower to be seen on today's card, like yesterday's. I used a square card base and First Edition 'Up, Up & Away' 8x8 papers. I covered the front of the card with one paper, then cut a second piece half the width of the card. This piece was mounted onto a punched piece of white textured card, then adhered to the front of the card over a strip of ribbon. The corsage was cut from different colours of cardstock, chopped about a bit, then layered up. The completed piece was adhered with foam pads to a funky scalloped frame topped with a patterned paper panel. 'Just Because' was cut from white textured cardstock, shadowed with green patterned paper then adhered with foam pads above a ribbon bow. Some extra flowers from the corsage cut were adhered to the corners of the card. All the little flowers were embellished with teeny pearls made from Card Candi.
Carts used:
Corsage & Scalloped frame- Formal Occasions
Just Because- Stamping Solutions
Thanks for dropping by!
Heather xxx

04/04/2011

Mother's Day wishes.....


I hope all you Mums out there had a great day yesterday. Both my boys were at home so mine was great! I wanted to share with you today the cards that I made for my lovely Mum (who I know drops into my blog every now & then-she's new to this computer lark but is doing great with it!) from the boys and me & my other half. Hubby's Mum lives in Oz so she'll get a card in May (Aussie Mother's Day) I used some fab new papers for both cards from First Edition Paper called 'Hideaway' (zingy citrus palette) and 'Spring Feast' (pastel pinks & greens) which I got from The Range.
Now I normally use paper/fabric flowers on my cards, but when I saw this cute bouquet I knew that I wouldn't need to use any on this card. I cut the bouquet from different colours of textured cardstock, layered 'em up, added some irridescent medium for some bling, and a narrow ribbon bow. I cut 2 scalloped oval panels, adding an embossed oval to one and a patterned paper oval to the other one. 'Nan' was cut from lemon glittercard and adhered to an orange shadow. The bouquet & 'Nan' were adhered to the panels with foam pads. 'Happy Mother's Day' was cut from more lemon glittercard, again shadowed with orange, the adhered with foam pads over a punched, ribbon trimmed border.

The other card is a tent fold landscape with the bottom 2 corners rounded off. I added a punched, ribbon trimmed border to conceal the join in the two papers. I cut a frame with circular aperture and a shadow, layered them up and added a piece of paper behind the aperture to hold the sentiment cut from white glittercard. 'Mum' was cut from the same paper used on the bottom of the card, shadowed with white textured card then adhered to the border with foam pads. I added a smattering of pearls to the larger flower centres, three pearls to the bottom right hand corner of the card and to the frame which was enhanced with a Prima bloom, WOC 10mm roses and a Bo Bunny ribbon bow.

The inside of the card was decorated with a simple punched border and Mother's Day sentiment.
Carts used:
NAN CARD-
Bouquet,scalloped/plain ovals-Formal Occasion
Nan-Life's a Party
Happy Mother's Day-Calligraphy Collection
MUM CARD-
Frame-Ashlyn's Alphabet
'Mum'-Beyond Birthdays
Simply the best sentiment-Wild Card
Happy Mother's Day-Calligraphy Collection
Thanks for looking!
Heather xxx

01/04/2011

Thanks so much!.....


I haven't posted a double twisted easel in a while so here is one for you today. I've used this cute pot before on a couple of Mother's Day cards but I thought that I'd use it this time for a Thank You card. I used papers from the Dovecraft Sugar & Spice 8x8 pack. The flower pot and shoot was cut from different colours of textured cardstock, chopped about and re-constructed. It was then adhered to a scalloped embossed circle and a bloom added with silicone glue. The sentiment was cut from pink cardstock shadowed with brown, then also adhered to a scalloped circle. Both circles were attached to the panels with foam pads.
A punched, ribbon trimmed border creates the stop.
Carts used:
Shoot in pot-Wall Decor & More
Scalloped/plain circles-Winter Woodland
Sentiment-Stamping Solutions
Thanks for dropping by!
Heather xxx