31/08/2010

First Christmas card this year.....

I SO didn't want to get into Christmas mode- it's not even September yet for heaven's sake!- and now I can't flippin' well get out of it! I have no choice really because my Christmas Workshops start next Wednesday so I've been churnin' 'em out! I won't be able to show all the Christmas cards that I make because most will be for the workshops but I'll try to post at least one a week. However, here's one I can show you. It's another shaped card, and I've used the gorgeous 'A Silent Night' papers by Papermania.
I covered the card with green spotted paper, added a smaller gold panel topped by a smaller still piece of Christmas script paper. This was adhered flat to the green portion. Another matted & layered panel was created with cream card embossed with a Papermania embossing folder and a piece of holly paper. I added narrow green velvet ribbon, a Prima poinsetta and holly leaves punched from gold mirri card and a sentiment also cut from gold mirri. This panel was adhered with foam pads. Red gems complete the card.
Carts used:
Shaped card & 'Season's Greetings'- Winter Woodland
Thanks for looking!
Heather xxx

30/08/2010

Out with the old.....


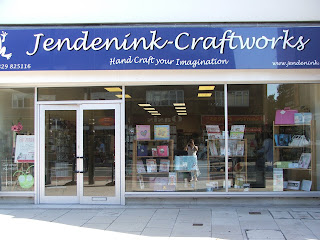
I thought that I'd show you some photos of the opening of our new shop on Saturday...here's the old one, almost empty..... ...and here's the new one with it's brand spanking new sign.. don't you love that strapline...'Hand Craft Your Imagination...!!....


..lots of YUMMY papers in the paper racks (pre-opening).....

...a break for lunch......


..Jennie in the shop doorway ready to welcome the first customers.....


..open and getting busy......


Sharon, our registered Pergamano teacher at her Make & Take......


...and Beccy from Do-Crafts demo-ing their fantastic Christmas Range...
We had a fantastic, succesful day! We had lots of new customers who were delighted that a craft shop had opened in Fareham. Our loyal Stubbington customers came in too...we really appreciate their loyalty, it makes what we do worthwhile! Thanks everyone for making it a great day for us!
I'll be back tomorrow with a C-word card!
Heather xxx


27/08/2010

P.s .... I love you......


Don't you just lurve red and black together on a card? It makes for a very dramatic (and it has to be said!) sexy end result! I got this fab paper on sale at The Range in Gosport..it's called 'Paris Nights' by g.c.d. The black script paper is in french..ooh la la! I hadn't a clue what to put on this card- I'd put the ribbon and flower on but couldn't decide whether to put a phrase or an image on it. So I trawled through my limited selection (yeah right!) of carts and came up with 'PS. I love You' which I thought would go rather well. So I cut it out from red glittercard and black mirri, layered it up, adhered it with foam pads, added 3 miniature roses...et voila!.. finis! I decorated the inside with a punched border and matted sentiment panel embellished with 3 punched hearts.
Carts used:
Sentiment- Wall Decor & More
Have a great weekend all... we open the new Jendenink Craftworks tomorrow. We've (especially The Boss-Jennie) have been running around like the proverbial wotsits in an attempt to get the old shop stripped and the new one stocked..It's been bonkers at times but as far as I know we are set to go. If any of you are around in Fareham tomorrow morning (Saturday 28th) please drop in. We open at 10am and will have a cardmaking demo by someone from Do-Crafts and, people, you'll think you've died and gone to Heaven when you see what is on offer!
TTFN and hope to see you tomorrow!
Heather xxx

25/08/2010

Happy Birthday Amber!......


I've made this shape of card before but never posted it because it was for a workshop. That particular card was cut with original bug owners in mind but I made this one using the Expression- and it's JUMBO, people!! The card was made for the youngest daughter of some very good friends of ours who was 16 yesterday.I cut it at 7 3/4" twice (Shadow/blackout) and adhered the two pieces together down the left hand side (you can see this clearly in the second photo). I cut another phone shape in green polka dot paper (DCWV) and covered the base card with it. A phone (layer) cut from floral paper (DCWV) was adhered over a silver mirri base cut and a screen cut from more mirri was adhered to the floral paper. I punched a hole with a Cropodile in the top left corner of the phone and inserted an eyelet. Assorted beads and a handbag charm were threaded onto a piece of fine silver cord, threaded through the eyelet and secured at the back. The phone was then adhered to the card front with foam tape. Black letter stickers ( yes.. I know!) were applied to the screen to spell 'Happy Birthday!' and number stickers were applied to the key pads. I cut 'Amber' from glitter card with a silver mirri shadow and adhered the letters at an angle across the card front with foam pads. A layered bloom and a flower-shaped gem complete the card.
Carts used:
Card base & mobile phone- Paisley
Amber- Ashlyn's Alphabet (Base font)
Thanks for dropping by!
Heather xxx

24/08/2010

Happy Birthday shaped duo.....


First of all I'm so sorry about the terrible photo of the 1st card, but I really wanted you to see it and I'm afraid that this photo was the best of 3! I made these cards for my SIL Lisa and niece Terri who both had a birthday on Monday. I used the same shape of card but Terri's card was more squat than Lisa's. They were both made in exactly the same way using DCWV papers. For Lisa's card I added lippy and nail polish embellies and for Terri's a pair of leather-look killer heels! Some layered blooms and pearls finish the cards.
Carts used:
Card bases- Winter Woodland
Shoes, lippy and nail polish- Forever Young
'Terri' & 'Lisa'-Winter Woodland
'Happy Birthday'-Calligraphy Collection
Thanks for looking!
Heatherxxx

23/08/2010

'Mr & Mrs' shaped card.....


My cousin, Philip, got married to Jaqui a couple of months ago. They were married abroad but had a party on Saturday for all their friends and rellies who couldn't make the actual nuptuals. Here is the card that I made for them...better late than never! I used the same shaped card base as yesterday's card and the same paper as the post previous to that. I cut the centre from the matted panel and added a scalloped oval, also matted in pink. In the centre of the aperture I added 'Mr & Mrs' cut from white pearlescent card shadowed with pink. I adhered a heart-shaped pearl over the heart beneath the 'R'. A large rose, some shimmery, sheer pink ribbon and some pearl strands complete the card.
Carts used:
Shaped card base- Winter Woodland
Scalloped oval- Ashlyn's Alphabet
Mr & Mrs- Sweetheart
Thanks for dropping by!
Heather xxx

21/08/2010

Thinking of you......


Isn't the shape of this card lovely? It's not a standard C5 card cut to that shape, it's actually 2 scalloped 'lozenges' adhered together to make a card base. The shapes were cut at 5 1/2" from plain white cardstock then adhered together with PVA glue down the left hand side (you can also glue across the top to make a tent fold) I cut another lozenge from pink paper and adhered it to the front. Another lozenge with a white shadow was cut and adhered together. An oval frame cut from white card, then embossed, was place onto the blue lozenge, I drew around the inside then cut it out to create an aperture. The oval frame was then adhered with foam pads. Before adhering the panel to the front of the card I cut an oval from contrast paper and adhered it to the front of the card. Then the panel was adhered over it with foam tape. I added a butterfly die-cut (whaaat?!!) and a layered flower. A sentiment cut from pink cardstock was adhered inside the aperture. I actually made this card for my Mum because it was a year ago today (by date - 21st August but yesterday by day- Friday) that my lovely Dad passed away and I wanted her to know that I was thinking of her on what will be a difficult day for her.
Carts used:
Shaped card- Winter Woodland
Oval frame-George
Thinking of you-Stamping Solutions
Thanks for dropping by!
Heather xxx

19/08/2010

Wedding window......


Here's another aperture front card ( I really must find a better word to describe these cards!) this time a wedding card. I used lovely Papermania wedding papers and chose 2 designs. The front of the card was covered with wedding script paper and the apertured front with lovely rose print paper. I added a strip of punched cardstock down the edges of the card and a scalloped, embossed oval around the aperture. The heart was cut from silver mirr (x2) and pink pearlised cardstock. The pink portion was adhered to one silver heart with foam pads, a piece of cord adhered to the back and then the 2nd heart adhered to the completed front heart with foam pads. This was then suspended from the centre top of the oval with a glue dot- don't remove the clear backing from the dot as it will stick to the front of the card when you put it into the envelope. 'Wedding' was cut from more pearlised card and adhered flat below the aperture. A sheer bow, blooms, leaves and pearl sprays complete the front of the card. The inside was completed with a punched border and a simple sentiment panel.
Carts used:
Scalloped oval- Ashlyn's Alphabet
Heart-Love Struck
'Wedding'-Designer's Calendar
Thanks for looking!
Heather xxx

17/08/2010

Seasoned with love......


What an apt sentiment for a cute pepper grinder! I used Henbury Lane papers for this card and some luscious dark blue glitter card. I added a blue mirri card blackout to the pepper grinder, a layered bloom and some lavender ribbon. The sentiment was cut from more glitter card and shadowed with blue mirri. Three punched hearts and a smattering of pearls complete the front of the card. The inside was decorated with a simple punched border and sentiment panel.
Carts used:
Sentiment & Pepper grinder- Wall Decor & More
Wow! Just one cart! Who'da thunk it?!
Heather xxx

16/08/2010

Hello......


Here's a sweet and simple one for you! Papermania Summer Bloom papers, a cute pink mirri card bike with it's basket stuffed with teeny flowers, a layered flower, a glitter card 'hello' and pink spotty ribbon combine to send a cheery hello to someone you love!
Carts used:
Hello- Wild Card
Bike- Heritage
TTFN!
Heather xxx

13/08/2010

Get Well Soon.......


Here's another Get Well Soon card for you to start the weekend. This one is so simple it's not true! I just covered the front of the card with Summer Bloom paper, added a border wrapped with ribbon, then cut an aperture using a scalloped oval frame as a guide. The frame was embossed then adhered with foam pads. A bow was added to the border and a layered flower to the top right of the card. The inside of the card was covered with more Summer Bloom paper, then 'Get Well Soon' cut from green cardstock, was adhered flat inside the aperture. A smattering of pearls and some glitter finish off the card.
Carts used:
Scalloped frame- Ashlyn's Alphabet
Get Well Soon- Calligraphy Collection
Have a great weekend!
TTFN!
Heather xxx

12/08/2010

Feel Better Soon......


I picked up this paper from The Range last week. It was on sale so I snaffled it! It's DCWV Garden Party 8x8" stack. I really like this pink/brown ice-creamy colour combo. I covered the front of the card with pink gingham paper then matted a piece of floral paper onto cream card, added a small piece of butterfly paper and punched cream card wrapped with brown ribbon and adhered it to the centre of the card with foam tape. I cut a scalloped frame from cream card,embossed it & backed it with brown/pink spotted paper and adhered it to the middle of the panel. 'Feel Better Soon' was cut from cream cardstock and adhered inside the frame. Layered blooms and leaves were adhered to the bottom left of the frame and a butterfly closely cut from patterned paper was added to the top right. Another butterfly adorns the inside of the card.
Carts used:
Scalloped frame-Stretch Your Imagination
Feel Better Soon- Lyrical Letters
Thanks for dropping by!
Heather xxx
p.s went to see The A-Team this morning..It's fantastic fun! A Must See IMHO!!!!

11/08/2010

Baby window card.....


Here's another card made in exactly the same way as yesterday's card except that the baby silhouette is adhered inside the aperture rather than suspended from it. For this one I used Papermania's Henbury Lane papers, white glittercard for the baby silhouette and a beautiful flower from Sarah's Cards (.co.uk). I just added a satin ribbon row, some satin roses, leaves and pearls & a punched trim along the bottom of the card.
Carts used:
Baby silhouette/Baby word- Heritage
Scalloped frame- Ashlyn's Alphabet
Thanks for looking!
Heatherxxx

10/08/2010

Window-front card....


I made a new kind of card (for me at least!) for the Swarm that I hosted last Saturday. As you can see the card has an apertured front added to it. It looks quite bulky but it actually squishes flat to go in the post. This kind of card isn't new, a version has been made on Create & Craft, but my ladies haven't tried one so I thought we'd give it a go and they did really well and went on to make more! This isn't the actual card that we made but the process is the same. I used a C5 card and an 8 1/4" square piece of cardstock for the front and using a Hougie board scored one edge of the card @ 2, 3 & 4.5 cms then flipped it over and scored the opposite edge at the same measurements. I covered the largest front panel with paper and the two 2cms panels at either edge of the card with contrasting paper. The front of the card was covered with a 3rd paper (I used Papermania papers) I cut a 5 1/2" scalloped oval frame, then placed it on the large panel of the scored piece and drew around the inside of the oval. This was cut out with scissors. I cut an acetate oval, punched a hole in the top and threaded silver cord through the hole. The oval was suspended from the top of the oval aperture using a glue dot. The scalloped oval frame was embossed then adhere to the panel with foam pads. Double-sided tape was applied to the back of the 2cm panels and the whole apertured piece was adhered to the front of the base card.
I cut a rose from pink & green cardstock, assembled it then adhered it to the acetate oval. I added a small acrylic pebble to the rose to look like a raindrop. I added a bow and 'Love' cut from pink cardstock with a smaller contrasting punched heart for embellishment. A little smattering of glitter and some pearls finish off the card front. The inside was decorated with a simple punched border and sentiment panel.
Carts used:
Scalloped oval frame- Ashlyn's Alphabet
Love- Love Struck
Rose-Wild Card
Acetate oval-George
Sorry I've not been posting as much but it's taken me a while to get back into crafty mode!
Thanks for visiting today!
Heatherxxx

08/08/2010

Autumnal Wedding....


This card was another 'off the wall' commission. The brief was autumnal colours (reds, golds, browns) lilies or sunflowers, leaves but no pumpkins. I had never been asked to do a wedding card with these requirements but heyho! who am I to question why? Luckily we had some lovely, glittery, autumnal paper in the shop which made a perfect backdrop for the golden bridal couple. The paper was matted onto brown card then copper mirri. I wrapped a piece of brown ribbon lengthways down the card and added a bow, pearl strand and lilies. The couple were cut from gold glittercard and adhered with foam pads. The wording was cut from brown mirri, 'Laura' & 'Andrew' were adhered with foam pads, the rest adhered flat. To finish I added a swirl of gold gems.
Carts used:
Bridal Couple- Disney's Happily Ever After
Wording-Winter Woodland
Thanks for dropping by!
Heatherxxx

05/08/2010

Glam birthday....


I made this card for the eldest daughter of some very good friends of ours. Her birthday was on the day we set out for Ocean Village. I used K & Co papers and buttermilk and pink cardstock for this one. The buttermilk horizontal panel was embossed then adhered with foam tape to another slightly larger patterned paper panel which was matted onto punched cardstock. Ribbon and a layered bloom were added. I cut a scalloped circle from pink card and added an embossed buttermilk circle onto which I adhered a lippy and nail polish cut from silver & pink mirri card & dark pink glittercard. The pink mirri portions were also embossed with an embossing folder which was very similar to the patterned paper. 'Glam' was cut from glittercard and adhered at an angle across the circle. 'Happy Birthday' & 'Menai' was cut from mid pink glittercard and adhered with foam pads to the spaces above & below the centre panel. I added a smattering of tiny pink Papermania floral gems and decorated the inside of the card with simple panels.
Carts used:
Scalloped/plain circle & 'Menai'-Winter Woodland
Lippy, nail polish & 'Glam'- Forever Young
Thanks for looking!
Heather xxx

04/08/2010

I'm back!!....


Hi everyone! You may have been wondering where I've been for the last week...well this is it! We took a fantastic cruise on Ocean Village around the western med starting in Palma,Majorca then on to Tunis,Naples,Monaco/Monte Carlo, Ajjacio then back to Palma. Sadly Ocean Village will no longer exist after this season otherwise we would go on her again, but P & O are introducing a casual cruise so we will go with them. If any of you have a chance to go with Ocean Village before the season ends, I'd say go for it, you'll have a fantastic holiday that you'll never forget!
I'll post some cards soon !
Heather xxx