09/12/2013

An Australian Wedding........

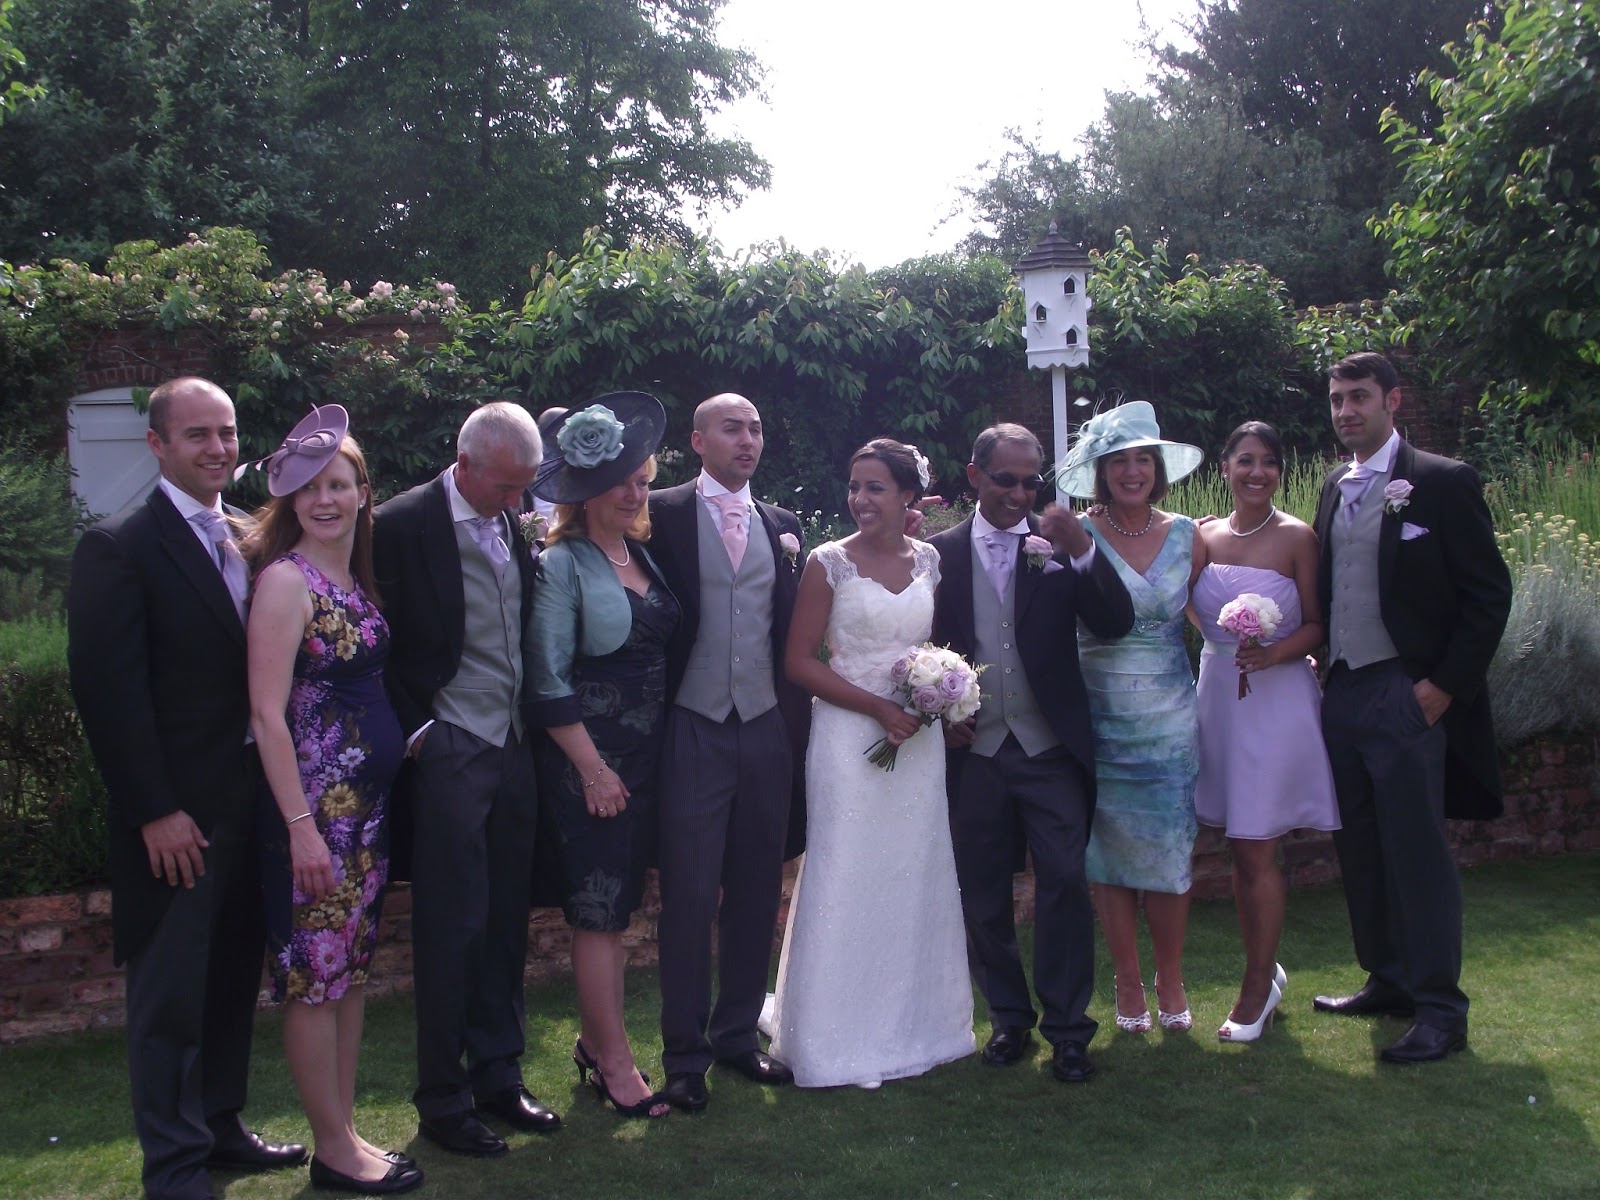
Our beautiful niece Anita married her sweetheart Peter ( a New Zealander) last Friday in Sydney, Australia. Doesn't she look absolutely stunning in her wedding suit? She married in a sari, and wore this beautifully embroidered skirt and blouse for her evening reception. Pete also looks very good in his wedding finery!
Of course I had to make them a keepsake card, which was wrapped in bubble-wrap to protect it in hubby's suitcase on it's long journey.

 This is the front of the card. All papers used in the card were Pink Petticoat downloads printed onto pearlised paper in 'Goldenrod' a lovely soft yellowy gold. The embossed circle holding Anita & Pete's names was adhered to a scalloped circle, then lavishly decorated with WOC roses and lilies, all of which had been pearlised with Glimmer Mist. I also added a jumbo pearl hatpin. The card base consists of two 8" square pieces of cardstock with a concertinaed section that opens out when the card is opened......


...to reveal the first section holding details of the big day...

...then the second section holding a marriage quote.....
.....and the third holding a 'recipe for love' complete with silver spoon...

...and the fourth and final section (a pocket) with an Irish marriage poem...

....into which was tucked a tag with our wishes to the bride & groom....

 ....here is the card, fully opened- please excuse the backdrop of my family room!
...and finally a 'pizza' box to keep it safe
Each page was embellished with die-cut flourishes & flowers, and a smattering of punched flowers too. The lid of the box was embellished with a WOC floral arrangement and a sheer bow with a pearl cabouchon in the centre. All of the sentiments were printed in 70% greyscale on pearlised paper with Lavenderia font.I'm glad to report that they were both thrilled with their card!
Carts used:
Heart on front of box- Love Struck
Scalloped circles, ovals, squares & rectangles- Elegant Edges
Silver spoon- A Child's Year
Fancy corners- Sweethearts
Tag- Picturesque
Phew! Talk about picture heavy! Sorry that the pics aren't brilliant, but I only realised on Saturday that I hadn't taken any pics of this card on my camera. Luckily, I'd taken some on my phone, so unfortunately they don't enlarge too much when you click on them. If you'd like to see the quotes contact me and I'll add them to my next post.
Thanks for dropping by!
Heatherxxxx

29/11/2013

Flying Easels......

I've discovered flying easels! I'd seen one on a blog and was challenged by Barbie (one of the ladies who comes to my Wednesday Workshop) to make one, so I made this one at last weeks workshop...
....then, because they are flippin' addictive, I made another one.....


.....and another one!
The gingerbread man is my favourite!
They are so easy to make. I used a 6" square card base folded into a standard easel, decorated in the usual way, except for with these cards you also add paper to the rectangular section above the centre (original) fold of the card as this section will be visible through the frame. Then I cut a frame, placed it on the front of the card, then drew around the inside of the frame. The semi-circular section is then cut away to create a 'bite' out of the front of the card. The frame was decorated with another frame cut from patterned paper (you'll need 3 frames altogether- 2 in cardstock and 1 in paper, the 3rd frame being used to neaten up the back of the card) I then cut an image with a flipped version which was attached to the top of the frame with coloured metallic cord. The frame was then attached to the folded card front with foam tape. The 3rd frame was adhered to the back of the card to neaten. I then decorated the card in the usual manner. You'll still need a 'stop' but it needs to be adhered further up the front of the card to allow the image in the frame to swing freely.
I cut all my frames at 5 1/2" and the images between 2 3/4" and 3". You can put anything in the frame- just make sure that it hangs freely in the aperture. It always helps to do a test cut first.
Carts used:
Snowflake:
Snowflake-December 25th
Frame- Elegant Edges
Let It Snow- Winter Woodland
Bauble:
Bauble- Joys Of The Season
Frame- Elegant Edges
Gingerbread man:
Gingerbread man (Real Dial size ON)- Paper Doll Dress Up
Frame- Elegant Edges
Sweet Winter Wishes- Winter Frolic
Sweeties- Simply Charmed
Make sure that you create a flipped version of your image, then trap the cord in between the two images. This creates a clean finish and the image looks lovely when it spins in the frame!
Thanks for dropping by!
To the ladies coming to the Swarm tomorrow the cards on offer will obviously be Christmas cards so bring all your Christmas papers, ribbons etc. See you then!
Heather xxx

20/11/2013

Charlie.....

Krishnan's girlfriend Sofia asked me to make her a card for her adorable little cousin Charlie's second birthday. She didn't exactly give me a lot of time to make it so I had to find something quick. I had some freebie Nit Wits sheets and they were perfect for digger-loving Charlie.
The card base is an 8" square, and I just used papers and elements from the Nit Wit kit matted onto brightly coloured cardstock. I adhered all of the paper elements onto plain cardstock to add stability, then adhered the pieces to the card front with foam pads. 'Charlie is 2' was cut from glittered cardstock then adhered to the card front with small foam pads.
Cart used:
'Charlie is 2'- Lyrical Letters (Jumbo font)
Thanks for dropping by!
Heather xx

10/11/2013

Anniversary Hearts.....

It was my brother and SIL's wedding anniversary at the beginning of last month. I had seen a card on the internet consisting of two hearts, one suspended inside the other, and really liked it. I was sure that I had a cart with very similar hearts on it, found it and made this card.....
The base card is an 8" square. The lilac backing paper is from an old stack in my stash and the centre square was embossed with a rose embossing folder. The two hearts were cut from the same backing paper (I used just one sheet of 12x12 for the card and the hearts) I punched holes in the top and bottom of each of the hearts. Using a piece of white cord I attached the solid heart to the centre of the hollow heart, then adhered the two hearts to the card front with foam pads. I added a '12' to the solid heart and my brother & SIL's names to the hollow heart using purple glitter card. 'Happy Anniversary' was stamped onto a piece of white card, cut into a pennant shape then adhered under a floral arrangement along with die-cut leaves and fronds. A heart shaped pearl on the solid heart and a smattering of pearls on the hollow heart completes the card.
Carts used:
Hollow & solid hearts- Sweethearts
names and numerals-Suburbia (Housewife font)
Thanks for dropping by!
Heather xx

05/11/2013

Happiness.......

I found a card made with this beautiful sentiment somewhere on line whilst blog hopping and wanted to use it. So I computer generated it and used it on this card......
I used papers that were a free download from Jak Heath. I cut a piece of the check paper smaller than the card front, matted it onto white card then adhered it to the card front with foam tape. I added a smaller rose print panel on top, then cut a shaped panel with oval aperture behind which the sentiment was adhered. This was adhered to the rose panel with foam pads. I embellished the aperture with pearls. A floral arrangement graces on corner of the card and a lilac polka dot ribbon the opposite. A trio of pearls in each remaining corner completes the card.
Cart used:
Aperture panel- Kate's ABC
Thanks for dropping by!
Heather xx

04/11/2013

Etaash........

No, it's not the beginning of a sneeze! It's actually the name of one of hubby's friends grandson. It was his first birthday at the beginning of October. We were invited to his party and I made this card to take along......
I love this little rocking horse and rider. I've used it on quite a few kiddie birthday cards. The card looks washed out in the photo but it's actually lilac. I used an 8" base card, then embossed a piece of textured white cardstock with an A4 embossing folder cut to a square slightly smaller than the card base. I matted it with lilac cardstock then adhered it to the card front with foam tape. 'Etaash' and the number One were cut from polka dot and check cardstock and adhered to the card front- the name was adhered flat and the one on foam pads. The rocking horse was cut from dark lilac pearlised cardstock, then adhered to the card front with a Papermania spring, which allows the rocking horse to rock- great fun for a little one!
A trio of pearls and a bow on the number and horses tail completes the card.
Carts used:
Rocking horse- A Child's Year
'1'- Base Camp (shadow)
Etaash- Car Decals
Thanks for dropping by!
Heather

30/10/2013

Another Batman for Kabir.....

Our friends' little boy Kabir was 8 at the beginning of this month. I made him a Batman card too (I've got one more to show you, but not yet!) . I used the same card base as Louis' card but just changed the figure.....

...to a running Batman. I added the 'POW!' word and adhered it to the card with foam pads. 'Kabir' & '8' were cut from blue holographic card, and also adhered with foam pads.
                                                                         Carts used:
                                    Card base and all other cuts- Batman, The Brave & The Bold
                                                               Thanks for dropping by!
                                                                         Heather xx
                                    

19/10/2013

NaNa NaNa NaNa NaNa NaNa Naaa...BATMAN!!!!

Cripes! That's a long post title!
One of the little BoyzNextDoor had a birthday at the beginning of the month and I decided to make him a Batman card. I usually steer clear of Licenced Character carts unless it's absolutely necessary 'cos the Disney Princess carts are a flamin' nightmare! Too many fiddly bits! But some are ok with fairly decently sized pieces that are easy to put together. This card came together quite quickly...
The card was made in it's entirety on the Cricut. I cut the card base at 'Fit To Page' and it came out at about 7.5 ins. The back of the card has a bat cutout in it! How cool! I covered the card front in yellow cardstock then cut the smaller orange and yellow mats on the machine. Batman was cut from blue cardstock, then adhered to the front of the card with foam pads. 'Get Ready For action!' was cut from dark blue cardstock then adhered flat to the card. 'LOUIS' was cut from blue holographic cardstock and adhered to the card with foam pads. Simples!!!
Cart used:
Batman/Get Ready For Action/LOUIS- Batman: The Brave & The Bold
Thanks for dropping by!
Heather xx

18/10/2013

Eastern Inspired.....

I have to admit that I am NOT a huge fan of the oriental look, so I was a bit doubtful about how I'd cope with an Eastern inspired card. I was commissioned to create a card for a lady turning 40 who has lived in Hong Kong, and this is what I came up with....

I had some lovely DCWV paper in my stash, which was oriental looking but pretty and feminine too. I matted the paper onto blue cardstock and adhered it to an 8x8 card. I embossed a piece of white cardstock and adhered it to the centre of the card with foam tape. 'Fiona' & '40' were cut from more paper from the DCWV stack then adhered to the card with foam pads. The little pagoda was cut from dark green and red mirri card then adhered to the card front. A WOC cherry blossom floral arrangement, some die-cut leaves, sheer ribbon bow and a trio of pearls completes the card
                                                                           Carts used:
                                                                      Pagoda- Pagoda
                                                              FIONA & 40- Base Camp
                                                               Thanks for dropping by!
                                                                         Heather xxx


13/10/2013

A Cut Above....

I picked up a lovely embossing folder (Trimcraft, I think) that had sewing accoutrements on it, and a blank area in the centre for stamping etc. But I thought that I'd use the centre space as an aperture to create this card....
After embossing a piece of white card I cut out centre. Then I adhered it to a piece of patterned paper slightly larger all round, after adhering a piece of sheer ribbon across the card just below the aperture. I then cut out the centre of the patterned paper leaving a border around the aperture. The computer generated sentiment was adhered behind the aperture then the whole panel was adhered to the frongt of a C5 card. I cut a pair of fancy scissors from silver mirri, and adhered it above the aperture. A stamped 'Sister' label, WOC bloom, die-cut leaves and a trio of pearls completes the card.
Cart used:
Scissors- Sentimentals
Thanks for dropping by!
Heather xx

03/10/2013

Polished!!!

I get a lot of inspiration for my cards by blog-hopping. I love to see what other crafters are making and sometimes it takes just that little spark to send your imagination into overdrive. That being said I make no apologies for these cards. They are a blatant COPY!!!! I saw them on Regina Easter's Cutting Café blog and thought 'I can do that!' So I did!

Now, I have to say that I have changed them a little, making one a little more 'blingy' than the other. I cut the nail polish bottle from cardstock twice in the shadow mode then once again in black pearlised cardstock at the same size. The bottles were adhered together at the top with a hinge, then the black cardstock was adhered to the card base. I then cut the bottles again in normal mode from purple holographic and glittered DCWV papers, and adhered the bottles to the card fronts with foam tape. I embossed the mirri card lids with a starburst embossing folder and added gems to the centres. I added glittercard numbers, ribbon bows and WOC blooms along with computer generated tags. The bottles were finished with gems around the curves of the bottles.
                                                                  Carts used:
Nail polish bottles- Forever Young
Numbers- Suburbia.
Pop over to the Cutting Café blog to see more of Regina and her DT's work.
Thanks for dropping in!
Heather xxx
p.s Just a heads up for the ladies who are coming to the Swarm on Saturday- In the words of Noddy Holder ....'It's CHRISTMAAAAAAS!!!!'
Yes people I will have Christmas cards for you, so if you could bring along your Christmas carts and papers that would be great (if you want to make Christmas cards that is!) I'll have other cards as usual too
See you Saturday!
Heather

27/09/2013

Rock Star!.......

I like making cards for the men and boys in my life-they really get the old brain cells going- and they make a nice change from flowers, ribbon and bling. This card, however, could be blinged up for a girl with a simple colour change and some gems in place of the stars.....
I used a 6" square card base and rounded the corners. I then used electric blue and black mirri card, and star holographic card to create the Rock Star word art. I embossed the blue mirri with a musical note embossing folder, and I cut some extra notes from black mirri to fill a space. The word 'Rock' was cut from black glitter card and adhered flat to the holographic cardstock. The stars were punched, and adhered to the card with foam pads. I added a couple of extra punched stars to complete the card.
Cart used:
Guitar word art, 'Rock' , 'Star'& musical notes - Hannah Montana
Thanks for dropping by!
Heatherxx

17/09/2013

Lisa & Amber....

I've got a couple more August birthday cards for you today, my SIL Lisa and our friends' daughter Amber......
...again, I chose to use the fab die-cuts from the Strictly Party A4 pack from Papermania.
I used this great elegant lady, with stamped birthday sentiment for Lisa's card...

....and this lovely profile for Amber's along with a sentiment tag from the pack..
Both die-cuts were mounted onto scalloped panels and adhered to embossed panels. I finished both cards with velvet ribbon bows and WOC blooms.
Carts used:
LISA
Scalloped panel-Elegant Edges
Pink scalloped edge-Elegant Edges
LISA- Suburbia
AMBER
Scalloped panel-Elegant Edges
AMBER-Suburbia
Thanks for dropping by!#
Heather xxx

14/09/2013

Terri.......

My niece Terri was 26 last month and I used the fab Papermania Strictly Party die cut and paper pack to create this card for her....
I used a piece of lilac patterned paper on a C5 card and added an embossed panel with a white mat adhered to the card with foam tape. I cut a scalloped panel and added the pretty die cut image then adhered it to the card front slightly off centre. 'Terri' was cut from lilac glitter card and adhered flat beneath the image. A sentiment tag, ribbon bow and WOC bloom completes the card.
Carts used:
Scalloped panel- Elegant Edges
TERRI- Suburbia (Housewife font)
Thanks for dropping by!
Heather xxx

08/09/2013

Krishnan (and Higgins) have a birthday....

Our eldest Krishnan is 23 today, and his guinea pig Higgins is one (or thereabouts. He was Krishnan's birthday present from Sofia last year). I thought that it would be a bit of fun to use Higgins in the birthday card I made because Krishnan is absolutely potty about this creature. I looked after Higgins whilst Krishnan was in Boston over the Summer and I have to admit I was very sorry to say 'bye to him when he came home.
I used an 8" square card base and some old Dovecraft paper matted onto brown cardstock on the front. I cut a 'cage', which was originally a circus wagon from which I chopped the decorative top and wheels. I used this cut to create an aperture in the front of the card, over which I adhered the cage. I added the birthday sentiment and 'KRISHNAN' cut from brown cardstock. Happy birthday was adhered flat and 'KRISHNAN' was adhered with foam pads. I asked Krishnan to send me a photo of Higgins, which I printed off twice and decoupaged. I then placed him in a VERY clean cage setting using torn  handmade paper for bedding. Now, Higgins can eat. He ate me out of house and home when he was with me. He got through almost a whole cucumber and god knows how much spinach (hence the speech bubble!) EVERY day! He knew when I opened the fridge door (our kitchen is at the end of the family room where Higgins lived) and weeked (that's what guinea pig squeaking is called!) like a mad thing 'til I fed him. He was quite fat when he went home!
 

The 'spinach' sentiment was computer generated using Wish I was Taller font then cut into a speech bubble shadowed with brown cardstock.
Krishnan loved his card and all his friends thought it was funny!
Carts used:
Cage (circus wagon)- Life's A Party
Speech bubble- George
Happy Birthday & KRISHNAN- Lyrical Letter (Jumbo font)
Thanks for dropping by!
Heather xxx

07/09/2013

Was it really a year ago.......

.....that my nephew Dan and his wife Sarah were married? Where does the time go?
I made this card to celebrate their first anniversary. The card base is an 8" square and the papers are from a First Edition pad. I used two different designs of paper, cutting one down so that it covered half of the green paper. I punched the edge of the blue paper with a MS border punch. I picked up some mesh ribbon a while ago from the pound shop over the road from our craft shop and it was perfect to add to this card. I also created a bow (not easy because the ribbon is quite thick) to which I added a Pink Petticoat sentiment tag, and a WOC bloom. For the centre panel I cut a scalloped rectangle and topped it with an embossed panel matted onto grey paper from the pad. The man & woman figures were cut from green and blue glittercard then adhered to the embossed panel with foam pads. I gave them each a little heart punched from the same paper but giving each figure the others heart (altogether now-aaaahhhh!)
'First' was cut from silver glittercard and adhered flat above the figures. A smattering of blue and green gems completes the card.
Carts used:
Scalloped rectangle- Elegant Edges
Couple- Going Places
First- Baby Steps
Number One Son is 23 tomorrow and I made him a fun card which I'll be back to show you then.
Thanks for dropping by today!
Heather xxx

01/09/2013

Home, Sweet Home.....

A couple of good friends of ours moved into a new house last month........
.....and this is the card that I made for them. The card base is a C5 and the background paper is from a freebie CD that is so old it has whiskers on it!
I embossed a piece of white card with a honeycomb embossing folder, then cut an aperture in it slightly larger than a scalloped frame which was cut from kraft cardstock and embossed. I also added a small bloom and punched leaves. The white panel was matted onto kraft and adhered to the front of the card with foam tape. I cut a dinky little house from kraft card and red glittercard, then adhered it inside the aperture with foam pads. 'Home Sweet Home, was cut from kraft and glittercard then adhered to the front of the card along with a ribbon bow and a smattering of red pearls.
Carts used:
Home Sweet Home- Sophisticated
Scalloped frame- Elegant Edges
House- Don Juan
Thanks for dropping by!
Heather xxx

28/08/2013

Chrissie's other card......

As promised, here is the other card that I made for Chrissie....

For this one I used the same paper as the previous card, but this time in a silver/grey colourway.
 I matted the paper onto silver mirri and then added a grey pearlescent, embossed strip matted onto a punched silver mirri border. I added sheer ribbon and bloom, white silk leaves and pearl sprays before adhereing it to the card with foam tape. 'Mr & Mrs' was cut from white pearlised cardstock shadowed with silver mirri. Pearls were adhered around the ampersand, the the finished word art was adhered to the embossed panel with foam pads. A trio of pearls in each corner completes the card.
Cart used:
Mr & Mrs- Tie The Knot
Thanks for dropping by!
Heather xx

25/08/2013

Happily Ever After

Chrissie, one of the ladies who comes to my Wednesday workshops asked me to make her a couple of cards for weddings that she would be attending last month, and this is one of the two that I made for her....
The card base is an 8" square. I used a pretty rose print paper that I had in one of my laptop files, printed onto pearlescent paper. I matted it onto ivory pearlised cardstock, then added an embossed panel to the left hand side of the card. I added a sheer ribbon, bow and bloom, pearl sprays and die-cut leaves, and a pearl to each intersection on the embossed piece.
'Happily Ever After' was cut from white pearlised cardstock shadowed with ivory. A piece of champagne coloured glitter card was adhered behind the 'Ever' oval and pearls adhered around it. The completed sentiment was adhered to the front of the card with foam pads. A trio of pearls above and below the sentiment completes the card. I'll show you the second card that I made for Chrissie next time.
Cart used:
Happily Ever After- StoryBook
Thanks for looking!
Heather xxx

15/08/2013

Menai.....

Rhea's elder sister (beautiful bridesmaid- see Rhea and Phil's wedding post) had her birthday at the end of July. I made her this card using one of the gorgeous decoupaged images from the Papermania 'Party' pack. The card base is a C5. The decoupaged image was mounted onto a scalloped rectangle, which was, in turn, adhered to a slim panel with punched edges. I used a butterfly edger punch to match the butterflies on the image. A strip of paper from the pack was adhered to the panel which was adhered to the card with foam tape. 'MENAI' was cut from dark aqua glitter card, and adhered flat to the patterned paper panel. 'Happy Birthday to you' was stamped with Memento Black ink in the top right of the image panel. A velvet ribbon bow and a smattering of gems completes the card.
Carts used:
Scalloped rectangle- Elegant Edges
MENAI- Suburbia
Thanks for dropping by!
Heather xxx

06/08/2013

Mike for Bryn

Bryn, one the LittleBoyzNextDoor, was six last month so I sent Mike Wazowski from Monsters Inc. to wish him a happy birthday! I cut Mike from pea green cardstock and adhered him to a panel of striped DCWV paper. I added a star embossed '6' and a speech bubble with a computer generated sentiment. Simplez!!!
Carts used:
Mike Wazowski- Best Of Pixar
'6' & speech bubble- Don Juan
Thanks for dropping by!
Heather xxx
 

05/08/2013

Another wedding card....

One of the ladies who comes to my Wednesday workshops, Chrissie, asked me to make her a wedding card for her son's wedding at the end of last month. This card is similar to the one that I made for Rhea's mum Mary, in that I used the same bride & groom image. I used an 8" square card base and papers from Pink Petticoat printed in 'Silver' onto white pearlised paper. The bride and groom were cut from black pearlised cardstock and the bride's dress from white pearlised cardstock. I cut the full skirt down to a more slimline dress, and embossed it before adhering it to the black image. I added a satin bow to the back of the dress and a veil cut from shimmer paper from Papermania. I finished the bride with some pearls across her hair and down the back of her dress. I embossed a piece of white pearlised cardstock, matted it onto grey cardstock and mirri with punched edges. I added a piece of sheer ribbon then adhered it to the left hand side of the card. A sheer ribbon bloom, punched leaves and a crystal stick pin were adhered over the bow. The sentiment was computer generated in 60% greyscale onto white pearlised paper, trimmed into an oval and adhered to a scalloped, mirri oval which was adhered beneath the floral arrangement with foam pads. A silver mirri fancy corner with pearl were added to the top right-hand corner to finish the card.
Carts used:
Bride & Groom- Wedding Solutions
Fancy corner- Heritage
Oval mats- Opposites Attract
Scalloped oval- Elegant Edges
Thanks for looking!
Heather xx

29/07/2013

Fifty......

My sister Valerie is three years and a day younger than me. It was my birthday on 12th July and hers on 13th, and for her it was a big one! She had a surprise birthday party on the Saturday and flew out on holiday the day after. For her big birthday I made her a big card, an 8x8" square. The card base was cut from white cardstock - I cut two scalloped squares then adhered them together down one side- with a matted square of patterned paper adhered flat. I cut a smaller square of the same paper, matted again, and adhered it offset with foam pads. I embellished the top right hand corner with a satin bow, white and aqua blooms and leaves die-cut from glittercard. I also added a pin. 'Valerie' & '50' were cut from glittercard then 'Valerie' was adhered flat and the '50' was adhered with foam pads. The sentiment was computer generated onto white cardstock, trimmed and matted, then adhered beneath the offset square with foam pads. A smattering of gems completes the card.

Carts used:
Scalloped card base- Elegant Edges
Valerie- Hannah Montana
50- Sophisticated
Thanks for dropping by!
Heather xxx

19/07/2013

Thank You Jan......

My eldest, Krishnan is in Boston, USA at the mo. He's at Harvard University Summer School studying Patency law. Before he went to Boston, he worked for the LLDC (London Legacy Development Company) who were responsible for selling off the Olympic Park, Stadium and Athlete's Village. His boss was a lady called Jan and before he left the company, he asked me to make her a thank you card, and this is what I came up with. I used a layout that I found on Silke Ledlow's blog 'My Life'. I used patterned paper that was a freebie, cut into two different sized panels matted onto a larger white panel. I wrapped the panel with sheer green ribbon before adhering it to a C5 card base with foam tape. I topped it with a scalloped oval topped with a standard, embossed oval. 'Thank You Jan' was cut from black pearlised cardstock and adhered flat to the embossed oval. A floral arrangement, bow with pin embellishment and a smattering of pearls completes the card.
Carts used:
Scalloped oval- Elegant Edges
Plain oval-Opposites Attract
Thank You- Paper Lace
JAN-Suburbia
Thanks for dropping by!
Heatherxx

11/07/2013

Chelsea........

The same day that we went to Rhea & Phil's wedding, my great-niece Chelsea had her 8th birthday.
I made her a Super DL card, which is basically a piece of A4 cardstock folded down the centre of the card instead of across it. I cut 2cms off the bottom of the folded card so that it would fit into an envelope. As far as I know there are no commercially produced envelopes to fit this size of card, so I made one using the envelope (in blackout mode)on page 65 of the WILD CARD cartridge cut at 8". Even with the foam mounted letters, the card fit neatly into the envelope. I posted it with a 1st Class Large stamp (I send all my cards with large stamps then I know that they will be delivered)
For the card I cut a panel of white cardstock slightly smaller than the card base and wrapped a piece of American Arts ribbon around the bottom, and added a bow. I then adhered it to the card with foam tape.
'CHELSEA' was cut twice, once in white cardstock then again in different patterned papers. The paper letters were adhered to the cardstock letters. This gives the letters stability. All of the letters were adhered with foam pads. I added 'Happy Birthday' cut from purple glittercard and a smattering of gems to complete the card.
Carts used:
CHELSEA- Base Camp (using shadow feature)
Happy Birthday- ZooBalloo
Thanks for dropping by!
Heather xxx


09/07/2013

For our daughter and her husband.........

 Rhea's mum Mary asked me to make her a card for Rhea & Phil and I was only too happy to oblige. This card is slightly smaller than A4 because that's the size that the fancy frame came out. I just trimmed away the bottom of the card so that the cut fit. I used a Pink Petticoat paper for the background and topped it with a silver mirri frame, which I embellished with sequin flowers and pearls. The aperture in the centre was backed with Pink Petticoats French Script paper. The bride and groom were cut from black pearlised cardstock. I trimmed the full skirt from the bride to a more figure hugging style (uncannily similar to Rhea's dress in fact!) then drew around it twice onto white pearlised cardstock to create the dress and train, which I embossed. The train was adhered to the dress with foam pads. I created a veil from some shimmer 'fabric' paper from Papermania and adhered it to the bride's head (I cut a curly bun style by hand and adhered it to the bride's head first) and covered the join with small pearls. I added some 'buttons' to the back of the dress to finish. The frame was further embellished with WOC roses and lilies and a sheer bow. I also added a jumbo pearl and silver hatpin through the floral arrangement. The sentiment was computer generated onto white pearlised in 60% greyscale and Lavenderia (my favourite at the moment!) font, and matted onto silver mirri then adhered to the frame with foam pads.
Of course it needed a box!
Carts used:
Fancy frame- Ornamental Iron 2
Bride & Groom- Wedding Solutions
Tie The Knot (on front of box)- Tie The Knot
Thanks for dropping by!
Heather xxx

08/07/2013

Rhea & Phil's Keepsake Card........

As I promised yesterday, I'm back with Keepsake Card that I made for Rhea & Phil. At Northbrook Park, there are peacocks that roam the lawns and make a nuisance of themselves in the car park- they are very vain birds and love to admire themselves in the paintwork of the cars, one even went into one of the chalets and admired itself in the mirror at the bottom of the stairs! So it seemed fitting to use peacocks on the card. I used two 8" square cards adhered together to create a gatefold card base. I printed some Pink Petticoat papers onto white paper. The papers are actually lavender but don't look it in the pictures. I added a punched border across the card front , embellished with die-cut leaves and sequin flowers. A shaped panel cut from white cardstock and PP papers was adhered to the left front and a large scalloped heart cut from white cardstock, and topped with a smaller heart embossed with a swirl embossing folder was adhered to it with foam pads.
The peacocks (one of them flipped) were cut from white cardstock and then adhered to the base of the heart with foam pads. I added an 'R' & 'P' cut from lavender paper shadowed with white card, a small embossed heart, organza bow and floral arrangement and pearls around the heart to finish.

This is the inside left panel bearing a 'True Love' cut and heart corners....


.....the inside right panel with the 'Forever' cut and more heart corners....
 .....the outside right panel with die cut leaves and sequin flowers. This is partially covered when the card is closed.....
........the centre back, with a mini fold out book, 'Just Married' cut and heart corners, and the details of the wedding......

....and a beautiful wedding quote printed onto Safmat. The book closes with sheer ribbon ties...

...and finally. a box to put it in with another scalloped heart, 'Mr & Mrs' icon and sheer bow.
Phew!!!! So many pics!
Carts used:
Scalloped heart/plain heart- Life's A Party
Peacocks- French Manor
R & P- Sophisticated
Shaped panel- Elegant Edges
True Love/Forever/Just Married/Mr & Mrs/Heart corners- Tie The Knot
All of the Pink Petticoat papers were printed onto white pearlised paper, and the white cardstock is white centura pearl.
Thanks for dropping by!
Heather xxx


07/07/2013

Such a beautiful day.......

We've been to a wedding this weekend! Our very good friends Mary & Imroz's beautiful youngest daughter Rhea married her lovely fiancé Phil at the splendid Northbrook Park in Surrey. We have been praying for months for good weather, and boy did we have it in spades! It was GLORIOUS!! We sweltered all day and well into the evening and a great time was had by all! Here are the proud parents of the bride, Mary & Imroz.......

...and here is the inside of the Wedding Venue waiting for the arrival of the Bride and her attendants. The ceremony was a Humanist celebration (Rhea and Phil had had a legal marriage in the local Registry Office the day before)....

....and here she is! Isn't she stunning? I love this girl so much. She's bright (she must be 'cos she's a doc, as is her new hubby) funny, compassionate, loyal...I could go on ad infinitum. Rhea managed to keep it together but Phil couldn't and he was crying at this moment!.......

.....Music was provided by a fab duo from Australia called April Daze. Rhea and Phil met them in Melbourne when they were working there over the last 18 months. They were fab!....

 .....And here are the new Mr & Mrs D'Arcy....
....a united family photo with Rubin (Rhea and Menai's younger brother) on the right, and Phil's mum & dad Gina and Paul and his SIL Jess and his brother John who was his Best Man..........

 ...and Menai, Rhea's equally beautiful elder sister and chief bridesmaid....
......and all the bridesmaids plus Hannah one of Rhea's oldest friends...

....and finally, The First Dance by the new Mr & Mrs D'Arcy
What a fabulous day!!!
Thanks for dropping by!
I'll show you the keepsake card that I made for them tomorrow
See you then
Heather xxx