28/09/2011

On the Christmas Card bandwagon......

 ....well, everyone else is at it so why not me?!! I don't normally show Christmas cards (well not many) on my blog because most of the cards that I make are destined for Workshops or Swarms, but I was so chuffed with these that I wanted you to see them. For my faithful ladies, they will be available to make at the next Workshop/Swarm, and you will get the usual instructions! Now, the two C5 cards can be made on the Expression & Create (using the portrait function) but not the Original Bug (the frames will cut too small), but the square card with the circular aperture frame CAN be made on the OB. Not many of my ladies have the OB but I still like to make a version that they can create too.
The gold card on the right was cut from gold mirri and plain white cardstock (the front of the card is mirri, the back, white) The white card was scored across the scallops and adhered to the mirri card to make the base card. I added a frame with oval aperture cut from red mirri and Papermania paper. Red satin ribbon was adhered to the bottom of the frame before it was fixed over a contrasting piece of patterned paper adhered to the front of the card, with foam tape. The top of the aperture was decorated with punched poinsettas, white 'helibores' created from small Papermania punches, mini 'helibores' created in the same way, and holly & ivy leaves (punched again with Woodware/Dovecraft punches). Yellow pearls were added to the centres of all the flowers and holly berries (pearls coloured red with a permenant marker) were adhered below the helibores.
The 'Holly & The Ivy' sentiment was computer generated onto Safmat using CAC Pinafore font (free from Dafont.com),carefully cut out and adhered inside the aperture. You could replace my choice of sentiment with one of your choice. Mine was chosen to go with the papers & embellishments. All the frames were decorated the same.
Carts used:
Gold card base- Just Because Cards (there is an almost identical one on A Child's Year)
Oval aperture frame/circular aperture frame- Ashlyn's Alphabet
Before I sign off, could I just make an appeal to any ladies coming to my next Swarm on October 6th? If anyone has the Batman cartridge could they please bring it with them as one of the ladies would like to borrow it to make a Batman card for a little boy who wants to be Batman when he grows up!
Thanks!
Heather xxx

27/09/2011

A car for Louie...

 One of the little BoyzNextDoor had a birthday on Saturday, and this is the card that I made for him. He had Robots last year, this year Disney Cars. The card base is a side fold horizontal C5 made with a piece of A3 cardstock cut to size. I like tent fold C5 cards but they can collapse under the weight of heavy embellishments, so I like to make them so that they fold at the side. They are much more stable. I cut McQueen from red, black, white, orange, yellow & silver cardstock. I made sure that he would almost fill the front of the card as I wanted to make a cut-away card. When I had adhered all the pieces together (why are these Disney cuts so flamin' fiddly?!) I adhered McQueen to the card front with foam pads, then cut around him leaving a small border. The inside back of the card was covered with a red/black mat with rounded corners.
'Happy Birthday' was cut from black cardstock and adhered flat. 'Louie' was cut from holographic cardstock then adhered with foam pads. I added a speed embellishment to finish (sorry for the fuzzy photo!)
                                                                         Carts used:
McQueen & 'Speed'- Disney Cars
Happy Birthday- A Child's Year
Louie-Robots
Thanks for dropping by!
Heather xxx

23/09/2011

Paige.....

My hubby called me on Monday and said "Speak to Debbie" (she's one of his secretaries)" she needs a birthday card...." So I speak to Debbie and she wants an 18th Birthday card for her daughter for FRIDAY!!! (today). Bearing in mind that the card had to go to Slough in Berkshire that was a pretty big ask!
Anyhow, she gave me all the deets and this is what I came up with. It was in the post Tuesday morning!
I used My Mind's Eye ' 'Penny Lane' papers on an A4 card base. Paige is a fashion design student so I thought that the dress form was rather appropriate. I added some dark teal satin ribbon, a deep pink Prima bloom and some pearls coloured with permanent pens to match the pink mats.
Carts used:
Dress form & dress- Formal Occasions
Happy Birthday- Wild Card
18th & 'Paige'- Lyrical Letters
I've yet to hear whether Debbie & Paige liked the card. I'll let you know!
Have a great weekend!
Heather xxx

19/09/2011

Beautiful......

Here's another of the heads from the Art Nouveau cart. I altered this one a bit, as there was a HUGE flower joining the head to the outer ring. I didn't like it so I carefully cut the flower from each of the cut pieces and replaced it with a romanesque pearl headdress and a WOC bloom. Now I like it!  I added some teeny punched leaves and flowers to the circle frame as a finishing touch. The punched border is a Dovecraft punch, wrapped with pink satin ribbon topped with a bow. 'Beautiful' was cut from green shimmer cardstock, shadowed with white. A smattering of pearls completes the card.
Carts used:
Head- Art Nouveau
'Beautiful'-Home Decor
Thanks for dropping by!
Heather xxx

18/09/2011

Lovely......

Here's another beautiful image from the Art Nouveau cart. She's one of four standing/sitting figures. I cut her from pearlised cardstock and adhered her with foam pads to an embossed panel. The card was created by cutting 1" from the front of a C5 card then punching the edge with this lovely Woodware Border Punch . I backed the punched edge with more pearlised cardstock then trimmed away the excess. The papers are from DCWV Mango stack. 'Lovely' was cut from pearlised cardstock using Font 1 on the cart and adhered flat to the inside back of the card. I finished the card off with some pearls and a WOC bloom.
Cart used:
Figure & 'Lovely'- Art Nouveau
Thanks for looking!
Heather xxx

17/09/2011

Beautiful dreamer.....

This dreamy card was made with my latest aquisition, Art Nouveau. OMG! This cart is TO DIE FOR!!!
I can't tell you how I've wished for a cart with these kind of images on, and I have to tell you they are stunning. They are very easy to cut out and put together. I've made three cards so far with this image, and another one with a different head. Besides the heads (there are four in all)  there are four standing/sitting figures, numerous images including a dragonfly and scarab beetle, William Morris style flowers and two fonts! I have made two Christmas cards using this image and they are very easy to adapt. I'll show you those at a later date as they are for my Christmas Workshop, and my ladies get first look! I used Papermania's Rose Garden (??) papers for the card base which measures 8" x 5", and shimmer cardstock for the image. I prettied up the headdress with a Prima mini rose and some punched mini leaves. I added more punched leaves and teeny punched flowers to the circle frame. The pretty punched border is a Woodware border punch, which was embellished with pink satin ribbon and a bow with a jewelled hat pin pushed through it- I always stick a silver bugle bead on the end of the pins to make them safe to post- and a small Prima rose. 'Dream' was cut from pink shimmer cardstock, adhered to cream shimmer cardstock, then hand cut to create a shadow. It was adhered to the card with foam pads. A smattering of pearls completes the card. The Art Nouveau cart is available from craftsulove.co.uk and costs £49.99. They have sold out once and have re-stocked but I wouldn't wait too long if you want to get it as I can see it flying off the shelves again!
Carts used:
Art Nouveau Head- Art Nouveau
Dream- Graphically Speaking
Thanks for dropping by!
Heather xxx

15/09/2011

Delighted!......

This card is super simple with a lot of white, and a splash of colour in the centre. The white mat was layered onto black & hot pink cardstock. The shaped panel was cut twice from patterned paper, then one piece was cut in half horizontally and adhered to the other piece with a piece of punched cardstock adhered over the join in the papers. The completed panel was adhered to another plain white cardstock piece to give stability , then affixed to the centre of the card with foam pads. The elegant chandelier was cut from hot pink glittercard - it cut like dream!- and adhered to the shaped panel with foam pads, then topped off with a bow and a WOC bloom. 'Delighted' was cut from black glittercard and adhered flat. A smattering of gems completes the card.
Carts used:
Shaped panel- Just Because Cards (there are some super shapes on Storybook too)
Chandelier- Everyday Pop-Up cards
'Delighted'- Winter Woodland
Thanks for dropping by!
Heather xxx

12/09/2011

Glam!....


These fold back cards are THE easiest cards to make and they give you so much room to be creative in- you have the front AND the inside of the card to decorate. For this one I used a piece of A4 cardstock folded to A5 the cut down to just under 6" square. I folded the front of the card back on itself and rounded the corners on the back of the card. I used Paper Cellar 6x6 monochromatic papers to cover the inside back and the folded back front of the card. I adhered the papers flush with the edges of the card so that no matting & layering was required- simples!
I did add a smaller, thinner panel to the folded back section because I wanted to add ribbon & a bow- difficult to do when the paper is applied flush- and it was adhered with foam tape. The shaped panel cut from black textured cardstock and patterned paper was adhered to the front with more foam tape. A layered circle holds a nail polish bottle, a hot pink lipstick cut from black dotted mirri, holographic silver card and hot pink mirri card and the 'Glam' sentiment . Teeny punched flowers and a Prima bloom completes the front of the card.
                                        
The inside back of the card was decorated with another shaped panel embellished with more punched flowers and leaves, and the 'Happy Birthday' sentiment, all adhered flat.
Carts used:
Shaped panels- Just Because Cards
Scalloped circle- Winter Woodland
Plain circle- George
Nail polish/Lippy/'Glam'- Forever Young
Happy Birthday- Wild Card (RDS on)
Thanks for dropping by today!
Heather xxx

10/09/2011

Groovy!......

Our very good friend Adele is celebrating her 50th birthday. She had a party last weekend (we couldn't go because we were in Rome) which was 60's/70's themed, so I thought that this 'groovy girl' image would be great for her card. I used g.c.d paper for the background and some fab 'oil-on-water' paper for the front panel. All of the elements were cut from glittercard and adhered to the card with foam pads. I added an acrylic flower to the hole on the '50', and a couple of large blooms adhered beneath the top corner of the front panel.
Carts used:
Groovy girl/Groovy-Groovy Times
'50' & 'Adele'-Life's a Party
'at'-Base Camp (or any font cartridge)
Thanks for dropping by!
Heather xxx

08/09/2011

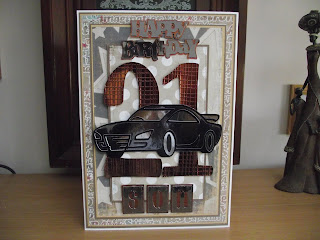
Twenty one today, twenty one today!..........

...you've got the key of the door, never been twenty one before! No, not me! Number One son is 21 today. Where on earth do all the years go? He's gone with his girlfriend and two other 'girl' friends to Bestival on the Isle Of Wight today for four days. Hopefully the weather will hold out, although I wouldn't bet my life on it!. Anyhow, a music festival wouldn't be the same if it didn't tiddle down with rain, and the kids came back smelling of roses would it? Four days without a shower! RANK!!!!
Krishnan (no 1 son) loves fast cars so I thought I'd use one on his card this year. The card is A4 in size and I used MME papers from the All Boy stack. I used a combination of brown, silver, gunmetal and black mirri for the cut elements. The large 21 was embossed with a Fiskars texture plate, and the car was adhered over the top of them with foam tape. I added a 'Happy Birthday' sentiment and 'SON' letter squares.
Carts used:
'21' & 'SON' squares- Don Juan
Car- Father's Day Seasonal
'Happy Birthday'- Stamping Solutions
Thanks for looking!
Heather xxx

07/09/2011

Roma!!!......

 This is where I've been for the last few days...Rome!!! This is the Vatican......
 ...the Colloseum......
 ... and the Trevi (three streets) fountain. We had a great three night trip to Rome, saw what we wanted to see, walked miles and ate FAR TOO MUCH GELATI (Ice-cream). It was hot as hell, crowded but fascinating. We were glad to get home though even though it was really chilly when we got back to Gatwick. I won't be going anywhere in Europe in the summer again, I'll leave it for Spring or Autumn! Right, onto today's card.
My boss Jennie and her hubby have bought a farmhouse in France, they are in the process of doing it up, and have become really friendly with the villagers who live nearby. One of the village shop-keepers (I think it's the cafe proprietor) is leaving the village to move to Paris. Jennie asked me to make a suitable card, A4 sized, that all the villagers can sign, and this is what I came up with. I used g.c.d Paris Nights papers, and my favourite gun-metal mirri card (can't get enough of the stuff!). I cut a huge Eiffel tower from the gun-metal mirri along with a table,wine bottle & glass. I added a layered Prima bloom and a computer-gnerated sentiment (Lansbury font downloaded from Dafont.com) and a satin bow across the top left-hand corner.
Carts used:
Eiffel Tower- Everyday Pop-Up cards
Table-Kate's ABC
Wine bottle & glass-Summer In Paris
Shaped panel-Just Because Cards
Thanks for dropping by!
Heather xxx

01/09/2011

Ruby Wedding Wishes.....

Sally & Frank, our ex-neighbours, are celebrating their 40th wedding anniversary on Saturday with a party. We can't make the party as we will be in Rome this weekend, but I sent them this card to help them celebrate. I hope they like it! They are the grandparents of the LittleBoyzNextDoor (Sally & Frank moved out, and their son, his wife and three littlies moved in!) so we still see them occasionally.
This card is a standard C5, and I used Papermania Cranberry papers, red mirri card and glittercard. I covered the front of the card with two different patterned papers and covered the join in the papers with a punched border wrapped in red & white swirl printed ribbon and embellished with two large pearl hearts. An embossed oval, adhered with foam pads to a shaped panel was fixed over the border and embellished with a large red rose and some smaller roses at the top and a smaller arrangement with some red pearl strands (coloured with a permanent marker) at the bottom. '40', cut from red glittercard was adhered to the centre of the oval with foam pads. The sentiment was computer-generated onto Safmat and applied below the border.
Happy Anniversary Sally & Frank!
Carts used:
Shaped panel- Just Because Cards
Ovals-George
'40'-Winter Woodland
Thanks for dropping by!
Heather xxx