24/12/2011

The Big Day.......

 ...No! Not Christmas Day, but a wedding day!  I made this card for my hubby to take to India last month. One of his friends' daughter got married and he asked me to make her a card. I didn't go for an 'indian wedding' look, as you can see, but decided on something pretty and delicate. I used a Z-fold A5 card base and punched the long edges with a MS heart punch. The papers are from the Fairytale 8x8 pack from Dovecraft. Although the mirri I used on this card looks gold it's actually silver. To decorate the panel on the front of the card I cut a fancy heart from pearlised pink card and backed it with a silver mirri blackout which I embossed after cutting. The hearts were adhered together with foam pads. I then cut a heart from white pearlised card, embossed with a heart folder after cutting, and shadowed with silver mirri. This heart was then adhered to the centre of the fancy heart with foam pads. Two pairs of  doves (one cut on 'flip') were cut from pearlised card, the wings removed from two doves, curled and then adhered to the other two doves to add dimension. I added a teeny gold pearl to each of the doves for eyes. The completed birds were adhered to the white heart. A sheer bow, pink WOC rose, pearl strand, gold heart-shaped pearl and the bride and groom's initials completes the front of the card.
 I computer generated a verse onto white cardstock, trimmed it to size, matted it onto silver mirri and adhered it inside the card......
...and to keep the card safe on it's journey to India I made a box from pearlised card, added an embossed, matted panel to the front with 'The Big Day' and a trio of punched hearts adhered to it.
Carts used:
Pink heart and blackout- Love Struck
White heart- George
Doves- Wedding Solutions
The Big Day- Phrases
'N' & 'P'- Calligraphy
I liked this card so much that I made another one for my stash!
I'd just like to wish you all a very merry Christmas, and a peaceful and prosperous 2012. Thanks to all of you who follow my little blog, and I'd like to extend a thankyou to all the lovely ladies who attend my workshops and Swarms who keep me on my toes!!!
MERRY CHRISTMAS ONE AND ALL!!!!!!
Heather xxx

16/12/2011

Here we go again!..........

I'm posting tonight from my Mum's place in Stafford. It looks like we are having a repeat of the chaos we endured last Winter! We've had some snow flurries here, but my brother who lives in Tunstall, Stoke-On-Trent, is snowed in!!! The M6 is in trouble, idiots are driving in dreadful conditions AND USING THEIR MOBILES AT THE SAME TIME! PUT THEM DOWN YOU MORONS!! Give me strength! What does it take to get through to these people? Anyhow I'm keeping an eye on the weather, and I may have to hightail it home early!
Well, onto today's cards. I was commissioned to make these cards by one of hubby's secretaries for her twin daughters' 21st birthdays.
The pink card, for Sophie is A4 in size and I used paper from the DCWV Mango Frost 12x12 stack. I kept the layout simple ( I always do for commission cards) and simply added a punched border bearing the name and a gorgeous frame which holds the '21'. I finished the card with some hot pink ribbon, a Prima bloom and a smattering of pearls.

Jade's card (also A4) was also made with Mango Frost papers, with the addition of a couple of swirls, some butterflies, white satin ribbon, pearls and Prima fabric bloom.
Carts used:
Sophie's card:
Ornate circular frame- Lacy Labels
'Sophie' & '21'- Art Nouveau
Jade's card:
'Jade' & '21'- Quarternote (font1)
Swirl-Home Decor
Butterflies-Stamping Solutions
Thanks for dropping by. Keep safe and keep warm!!!!
Heather xxx

10/12/2011

Holli......

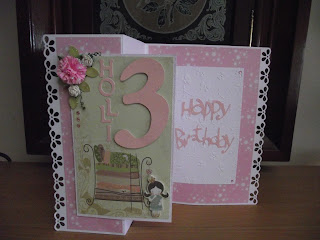
Holli, my little great-niece, was three last Wednesday and this is the card that I made for her. The card base is a Z-fold A5 and the papers are new from Dovecraft called Princess Fairytale. I punched each of the short edges with an EK Success punch. I used a star print paper for the front and inside back and a Princess and the pea print for the panel on the front of the card. I cut a princess from a second piece of paper and decoupaged it onto the original print. 'Holli' and '3' were cut from pale pink glittercard then adhered to the space above the illustration on the panel, Holli flat and 3 with foam pads.
For the inside of the card I embossed a piece of white cardstock with a butterly trail embossing folder and adhered it to the inside back of the card. Happy Birthday was cut from more pale pink glittercard and adhered flat to the panel. To finish I added a WOC floral arrangement and a smattering of pearls.
Carts used:
Holli & 3- Lyrical Letters (Jumbo font)
Happy Birthday- ZooBalloo
Thanks for visiting!
Heather xxx


07/12/2011

Butterfly hugs......

I've had a request to show this card today, so Lorraine this is for you! Lorraine comes to my Swarms and she saw it on Saturday and wanted to make it so I said that I'd blog it for her. The papers are Dreamcatcher again, this time in purple and yellow with teeny butterflies. I cut a large tag from white cardstock, then embossed it. I then shadowed it with a purple tag. I added a piece of patterned, punched paper to the bottom of the tag. 'HUGS' was cut from purple glittercard and adhered with foam pads above the punched border. A butterfly cut from Papermania shimmer cardstock in two shades of purple, with pearls added to the body, was adhered above the sentiment. A Prima and WOC floral arrangement was adhered to the bottom left hand corner of the tag, and a satin bow to the top. The completed tag was adhered to the card front with foam tape.
Carts used:
Tag- Lacy Labels (if you don't have this cart there are 2 tags on George)
Hugs-Lacy Labels
Butterfly-Everyday Pop-Up Cards
Good luck with the card Lorraine!
Thanks for dropping by!
Heather xxx

06/12/2011

BOO!........

.....No, not a Halloween Boo, but a Monsters Inc. Boo! I love Boo! She's a delightful little lady who refuses to be scared by those nasty old monsters hiding in her bedroom cupboard. I put Boo on a kick-stand card, which is a card with a smaller front than back, then you make up the difference with a panel to allow the card to stand. I used freebie Pink Petticoat 6x6 papers from Papercraft Essentials (I think!) I cut 1 1/2" off the front of the card and then punched the cut edge with a heart MS punch. I cut Boo from textured cardstock, and her dress was cut from more PP paper. The shaped panel was embossed with a butterfly trail folder and Boo was adhered to it with foam pads. I applied ribbon and a bow to the front of the card and then with the card closed I adhered Boo's panel to the card front, applying adhesive tape to the top of the panel only. I nicked a sliver off the bottom of the panel allowing the card to stand straight. Happy Birthday was cut from white glittercard shadowed with pink, then adhered to the card with foam pads. A WOC floral arrangement and a bloom to the bow completes the card.
Carts used:
Boo- Best Of Pixar
Shaped panel- Lacy Labels
Happy Birthday- ZooBalloo
Thanks for dropping by!
Heather xxx

05/12/2011

With Love, Mum.......

It was my Mum's birthday at the end of November, and this is the card that I made for her. I've made this card (or one similar to it) before, and because, as usual with family cards, I was running out of time, I resorted to a tried and tested formular for this card. I used the beautiful 'Dreamcatcher' papers again and a fold back A5 card base. The weeping wisteria bloom was cut from Papermania shimmer cardstock and the sentiment was cut from silver mirri. Both were adhered to a shaped, embossed panel with foam pads. I added a shimmery white bow and a trio of pearls to complete the card.
Carts used:
Shaped panel:
Lacy Labels
Wisteria- Art Nouveau
With Love- Sentimentals
Mum- Quarternote (font 1)
Thanks for dropping by today!
Heather xxx

02/12/2011

You Go Girl!........


I've got another card made with the beautiful 'Dreamcatcher' papers from First Edition for you today. This one went together really easily as there are only two cuts to it.
I did some simple matting and layering with two different papers and added a shaped panel which I embossed. I wrapped a piece of wide spotty ribbon around the bottom of the panel, adding a bow. The sentiment was cut from pink and purple Papermania shimmer cardstock and adhered to the panel with foam pads. I added a WOC floral arrangement, a smattering of pearls and a heart shaped pearl to the panel beneath the bow.
Carts used:
Shaped panel- Lacy Labels
You Go Girl- Phrases
I'm hosting a Swarm tomorrow, so for the ladies who are coming you'll need any Christmas carts that you have. As usual there'll be carts to borrow if you don't have any, and plenty of inspiration!
See you tomorrow, and to everyone else, thanks for visiting today!
Heather xxx

27/11/2011

L.O.V.E......

I picked up a new 8x8 First Edition paper pad from The Range last week, called 'Dreamcatcher'. It is absolutely gorgeous with foiled, glittered and un-embellished papers in shades of purple, lavender and pink. I love this foiled paper with dreamcatchers and feathers on it. I teamed it with an un-embellished patterned paper, silver mirri and lilac cardstock. For the central panels I cut and layered shaped 'labels', embossing the lilac panel and topping it with a silver mirri frame. the LOVE word art was cut from more silver mirri and adhered with foam pads. I added a satin bow, a WOC floral arrangement and a smattering of pearls.
Carts used:
LOVE word art/shaped panels/frame- Lacy Labels
Thanks for dropping by!
Heather xxx

25/11/2011

Peace.......

This is a card that I made for my Christmas workshops- I don't normally show my workshop cards but they are nearly over now, just a couple and a Swarm left, so I thought I'd show you a few. This is obviously a shaped card, and what a shape it is! It looks quite complicated to put together but as long as you follow a few simple rules, fancy shaped cards are easy to make. I've discovered that some shapes may look exactly alike, but when you come to put them together they stubbornly won't fit together properly- scallop-edged shapes especially- so the trick is to cut everything first and then stick it together. This card was made by cutting two shadow shapes in cardstock and one in paper. Now, you can stick the two cardstock shapes together by hinging them, but if you use a patterned paper (especially a script) and you put the paper the wrong way round on the mat prior to cutting, when you put the cut paper piece onto the base card shape you may find that the hinge is in the wrong place and the pattern on the paper runs the wrong way. So I adhere the patterned paper onto one of the cardstock pieces THEN adhere the two cardstock pieces together with a hinge, usually after a fair bit of juggling to get the scallops to match up perfectly. This way is practically fool-proof and a time and paper saver too!
Now, back to today's card. I cut the card base as described above and adhered green paper to the base card, then added the gold mirri fancy layer. I cut a script-patterned paper oval and a striped oval. I cut the striped oval in half and punched the straight edge with a MS punch. I wrapped gold ribbon around the oval below the punched border then adhered it to the fancy layer. I made a smaller panel in the same way as the base card and cut the word 'Peace' from gold mirri and adhered it to the smaller panel with foam pads. I added a gold bow, a trio of red pearls and a punched-flower arrangement to the smaller panel.
Carts used:
Shaped card & small shaped panel- Lacy Labels
Peace- Winter Woodland
Ovals- George
Thanks for dropping by and have a great weekend!
Heather xxx

21/11/2011

Warmest Wishes and please send my mojo back!........

I got fed up with making Christmas cards (I'm making them for workshops and Swarms so I need a constant supply of new cards!) so I took a break and made some everyday cards for my stash, and this is one of them. It's nice to make a guy's card every now and then if only to step outside your comfort zone and keep the old mojo going- mine's taken a hike at the moment and it's driving me nuts! I've started so many cards these last few days- got half-way then chucked 'em in a drawer because I can't think what to do next with them! MOJO, COME BAAAAACCKK!! I NEED YOU!!
Anyway, back to the card. I really like the autumnal colours in this card- quite appropriate for the time of year I think. I used DCWV papers from the Neutral stack, in a really simple layout. The heron was cut from textured cardstock and adhered to a shaped, embossed panel. I added some ribbon (yes, you can put ribbon a guy's card!) but instead of a bow I threaded a small piece under the ribbon and tied it in a knot. I added the sentiment, cut from brown cardstock and adhered flat, and a trio of Card Candi to finish.
Carts used:
Heron- Art Nouveau
Shaped panel- Lacy Labels
Warmest Wishes- Wild Card
Thanks for dropping by today!
Heather xxx

17/11/2011

Bliss......

Isn't this humming bird beautiful?!
I cut it from cardstock in jewel colours with just a little brown for the underneath of the wing feathers. I added glitter to the completed bird and some fab multi-coloured Stickle-type glitter to the 'Bliss' sentiment. The bird and sentiment were adhered to an embossed panel matted onto glossy green patterned paper. All patterned papers are from a DCWV stack. I added a sheer ribbon bow and a layered bloom to finish.
Carts used:
Hummingbird- Art Nouveau
Shaped panel & 'Bliss'- Lacy Labels
THanks for dropping by!
Heather xxx

15/11/2011

Incredible!........

I won a couple of carts on Ebay last week- woohoo!- Batman and Best Of Pixar, and this fab image of Mr. Incredible beckoned to me! I love The Incredibles, it's such a great movie and Mr Incredible is a hoot! He's a mild mannered Insurance clerk, married  to Mrs. Incredible (aka Elastogirl) with three children, Violet, Dash & Jak-Jak. Even the children have special powers!
Unlike the Disney carts which are really faffy to put together, the images on this cart are easy-peasy with minimal little bits.
I cut 'Bob' (his real name) from textured cardstock, and adhered all the pieces flat. I picked up a fab embossing folder which looks like a brick wall last week, so I embossed a piece of white cardstock and cut away some of the bricks to make a hole. I adhered a piece of black cardstock behind it and then adhered Bob over it with foam pads, so that it looks as though he's punched a hole in the wall! I added a 'POW!' cut from textured cardstock and adhered with foam pads, and a computer-generated sentiment. I kept the layout and materials simple, because I wanted the image to really pop, and I think I've achieved that! What do you think?
Cart used:
Bob (Mr. Incredible) & 'POW!'- Best Of Pixar
Thanks for dropping by!
Heather xxx

13/11/2011

Rock On!......

My brother Andrew hit the big 50 last Friday so I made and sent him a card, but not this one! I forgot to photograph it before I posted it, but luckily I'd made another almost identical one (Andrew's had a '50' and his name on it). I used foiled paper from the DCWV Rock Star stack and silver and black mirri card with some holographic card for the keyboard and the sentiment. The guitarist was cut from black mirri and I added a scrap of holographic card behind the guitar. The keyboard was cut from black mirri then adhered to a piece of holographic cardstock which was then trimmed to shape by hand. Both cut elements were adhered to an embossed mirri card panel with foam pads. 'Happy Birthday' was cut from holographic cardstock and adhered with foam pads below the panel. A smattering of punched black mirri stars and a couple of musical notes completes the card.
Carts used:
Guitarist/keyboard & musical notes- Quarternote
Happy Birthday- Stamping Solutions
Thanks for looking!
Heather xxx

10/11/2011

Acorn best wishes.........

I have bought three new First Edition paper pads from The Range over the last couple of weeks and I made this card with one of them, New Leaf. It's full of lovely autumnal colours with leaves and flowers and some lovely toning fabric-look plains. I thought that this leaf paper would make a great masculine card. I used a square fold-back card base, with a shaped panel on the front. I also added a smaller script embossed panel to hold the acorn cluster and sentiment which were cut from textured cardstock. They were both adhered to the shaped panel with foam pads. The inside back of the card was covered with a fabric-look plain paper in a grey-green colour. Card Candi in the same colours as the leaves on the paper completes the card.
Carts used:
Acorn cluster-Art Nouveau
Shaped panels & Best Wishes- Lacy Labels
Is it me or does that 'b' in the Best Wishes look a bit wonky?!
Thanks for dropping by today!
Heather xxx

08/11/2011

Wisteria..with love...

My late Dad planted a fabulous wisteria outside the front-room window of my parent's house, and year after year it has blossomed to give a glorious display of 'weeping' lavender coloured blooms, pretty much like the one on the front of this card. I loved this image as soon as I saw it and knew just how I was going to use it...as a frame. The bloom was cut from Papermania Shimmer Cardstock, layered up and adhered with foam pads to an embossed panel, wrapped with olive green ribbon and a bow. The embossed panel was, in turn, adhered to a slightly larger panel with a punched end. The card base was created by cutting a couple of inches off the front of an A5 card. The papers are from an old issue of Creative Cardmaking. The decorated panel was adhered to the front of the card with foam pads, adhereing the left-hand side only. The sentiment was cut from more shimmer cardstock and adhered with foam pads. A smattering of pearls completes the card.
Carts used:
Wisteria bloom- Art Nouveau
With Love-Sentimentals
Thanks for looking!
Heather xxx

05/11/2011

Proud as a Peacock.......

When I saw this peacock on the Art Nouveau cartridge I just knew that it would be gorgeous when cut and assembled- and I wasn't wrong! It's beautiful, especially when cut in shimmer cardstock as this was. I chose two shades of aqua and a deep peacock (!!) blue for the body and tail, and cream and brown for the wing under-feathers. The 'eyes' of the tail feathers and the head crest were blinged up with some Stickles and a black gem added for the bird's eye. The completed Peacock was adhered to an embossed oval, which in turn was adhered to a large tag. The card base is an A5 tent fold, and the papers are from the First Edition New Leaf pad. The pink patterned paper was edged with an EK Success punch.I added some narrow satin ribbon, a bow, some WOC cherry blossom blooms and a smattering of pearls.The sentiment was cut from more shimmer cardstock and adhered with foam pads.
Carts used:
Peacock & tag- Art Nouveau
Ovals- George
Sentiment-Phrases
Thanks for dropping by!
Heather xxx

03/11/2011

Blessings......

I just LOVE this card so much!! It was so easy to put together and it is so pretty. The paper, would you believe, is Christmas paper- Papermania Apple & Cranberry collection- but I think it looks great on this card and not at all Christmassy!
The card base is a 6" square and the front was covered completely with the Cranberry paper and a square of white textured cardstock matted onto red then white cardstock, wrapped with red satin ribbon, was adhered to the centre of the card with foam pads. The beautiful William Morris style rose was cut from textured cardstock and adhered to a layered semi-circle mat. The completed image was adhered above the ribbon border with foam pads. Below the border, the word 'Blessings' was cut from red textured cardstock and adhered flat. Some red Stickles on the roses completes the card.
So simple and so pretty! Gotta love it!
Carts used:
Rose and semi-circular mat- Art Nouveau
Blessings- Inspired Heart
Thanks for looking!
Heather xxx

01/11/2011

David......

My nephew David was 23 last Wednesday, and this is the card that I made for him. This MP3 player/I-Pod (whichever!!) looks a bit non-descript in the booklet- I think it's something to do with the colours used- but I wanted to cut it to put on David's card. So I went with black & white mirri card, added a few little extras, not on the cart i.e the navigation symbols on the dial, and I think that it looks really good! The papers are  from a veeerrry old DCWV stack. The silver mirri panel was embossed with musical notes, and I added a silver glittercard '23' shadowed with black and adhered with foam pads. The 'Happy Birthday' sentiment and 'David' was cut from black mirri and adhered flat. Some holgraphic Card Candi completes the card.
Carts used:
MP3 player- Paisley
'23' & 'Davis'- Don Juan
Happy Birthday- Stamping Solutions
Thanks for dropping by!
Heather xxx

30/10/2011

Magical Millie......

One of TheGirliezNextDoor had a birthday last Wednesday, and this is the card that I made for her. I pulled out one of my fiddly Disney carts (I try to avoid using them if I can!) and found Flora, one of the cute and cuddly Good Fairies from Cinderella. For the purposes of this card I flipped her to face right (this is something of an obsession- I think it's something to do with being right-handed) Flora was cut from Papermania shimmer cardstock and was adhered to the card with foam pads. The papers are from First Edition's Sweet Owl 8x8 stack. I added a punched border, some swirly ribbon and a polka dot prima flower with a blinged brad centre. I also added a burst of stars to the end of Flora's wand by adhering some glittery punched stars to some very thin strips of acetate. 'Happy Birthday' and 'Millie' were cut from dark pink glittercard and adhered flat.
Carts used:
Flora- Disney's Happily Ever After
Happy Birthday- A Child's Year
Millie- All Mixed Up
Thanks for dropping by!
Heather xxx

27/10/2011

For life......

We went to a wedding in Reading (that rhymes!!!) on Sunday, the bride was Indian and the groom was English (the bride is the daughter of one of hubby's friends) and I thought that these two beautiful swans were an apt theme for a wedding card, for when swans mate, they mate for life. The card was made with white pearlescent cardstock and silver mirri, with a dash of grey and peach on the swans. The shaped card base was cut twice from white cardstock and silver mirri, then adhered together and hinged from the back. The scalloped oval was embossed with a beautiful swirly dot embossing folder and shadowed with silver mirri. The swans (one of them flipped) were cut from more white pearlescent card with one of the layers cut in grey, and the beak in peach. I curled the edges of the feathers upwards around a paper piercer, which gives a very realistic look to the finished swan. I added some Glamour Dust to the swans for a bit of bling and black gems for the eyes. They were adhered, facing each other, with foam pads. I added some swirly white ribbon,  a sheer ribbon flower with a pearl centre, pearl strands, an embossed heart with silver shadow, and the bride and groom's initials. Four pearl Paper Cellar hearts completes the card.
Carts used:
Shaped card base/scalloped oval/heart- Lacy Labels
Swans- Art Nouveau
'P' & 'D'- Winter Woodland
Thanks for dropping by!
Heather xxx

25/10/2011

Numpty Magic!..........

There's a bit of a story behind this card. My nephew Dan had his 28th birthday on Saturday ( I can't believe he's that old- he was a titch when I met my hubby!) and he has an alter-ego- yes, you guessed it- Numpty!
Now Numpty is a Magician, and a very silly one at that! You can see Dan in all his Numpty glory on YouTube (just type in Numpty Magic). You'll catch glimpses of his two delightful nieces (Chelsea and Holli) who are his willing assistants. He's a lovely bloke, very silly at times, and smashing with kids, Chelsea and Holli adore him. He's marrying his fiancee Sarah next August- now there'll never be a dull moment in THAT marriage! I decided to go with a magic theme for his card and I came up with this! It's a standard C5 card and I used some starry patterned paper and lots of silver mirri/holographic cardstock. The top hat was cut from black mirri and the bunny peeping from the brim was cut from white Bazzil. I also popped a magic wand in there! I added Dan's name and his alter-ego's name cut from holographic cardstock and adhered with foam pads. The starry punched border is an EK Success punch.A smattering of punched stars completes the card.
Carts used:
Top Hat/bunny/wand- Paper Doll Dress Up
Dan/Numpty Magic- Don Juan
Thanks for dropping by, and take a look at Numpty!
Heather xxx

24/10/2011

The Magic of Winter #2........

Here's another version of my Magic Of Winter card of a couple of posts ago. This time I made a Z-fold card  from a square card with the front of the card folded back to the fold. I used papers from the same stack as version 1 and added some fab holographic Card Candi. This card can be made with Original bug and the Create, whereas version 1 can only be made on the Expression.
Carts used:
Shaped panel/snowflake frame- Lacy Labels
The Magic of Winter word art- Winter Woodland
Thanks for dropping by!
Heather xxx

22/10/2011

Congratulations Carol.......

This is a card that I made as a commission last week. I had just a week to come up with an idea and make a card, and I'm pleased with the result. So was the lady who ordered it! The recipient is a nursing graduate, who is also a nurse practioner and has decided to 'go the whole hog' and train as a doctor! The card is A4 in size and was made with DCWV Neutral Stack papers. The papers are quite muted but are glittery, and I used aqua cardstock for matting. I added a satin ribbon and bow, a mortarboard (graduate cap) scroll and a clipboard with a patient treatment sheet (computer generated) The sentiment and recipient's name were cut from cream glittercard, shadowed with aqua cardstock and adhered to the card with foam pads. All of the elements were adhered to an embossed panel, also with foam pads.
Carts used:
Mortar board/Congratulations- Everyday Pop-Up Cards
Scroll- Wrap It Up
Clipboard- Fabulous Finds
Carol-Winter Woodland
Thanks for dropping by!
Heather xxx


20/10/2011

The magic of winter.......

The main reason that I bought Lacy Labels was to make shaped base cards, as there are so many lovely shapes on it. This card is just as it is in the cartridge handbook (apart from the sentiment) so I literally made a large label and turned it into a card! I cut two label shapes in cardstock, one in silver mirri and one in spotted paper (DCWV Winter Stack). The cardstock pieces were adhered together at the side (hinged at the back), the silver mirri piece adhered on top and the paper one which is slightly smaller (the pieces are cut to nest perfectly) adhered on top of that. The silver mirri snowflake frame was adhered to the front of the card with foam pads. I added white glittercard snowflakes (cut out with the layer function) and some clear gems to the centres of the snowflakes and around the frame. The sentiment was cut from white glittercard shadowed with blue mirri and then a larger silver mirri shadow. It was adhered to the centre of the card with foam pads. To complete the card I added a sheer double bow with a snowflake over the knot.
As the bottom of the card was bowed I cut a sliver off it to make it stand level.
Carts used:
Card base/snowflake frame- Lacy Labels
Magic Of Winter word art-Winter Woodland
Thanks for dropping by!
Heather xxx

18/10/2011

Precious Ones.........

I bought a new cartridge at the beginning of this month, one that I'd been umming and aahing over for ages. I decided to buy it and am I glad that I did! My giddy aunt! This cart is FAB! I bought it just for making shaped card bases with (can you guess which cart it is is?) Crikey! There are tons of shapes on this cart and I've been having a great time making some super shaped cards. I've just finished a wedding card for the weekend- I'll show you that one later- and I'm chuffed at how it turned out. For now though, I've got a couple of baby cards to show you. For the card base I cut two scalloped ovals in card (joined together at the side) and one in paper which was adhered to the scalloped card base. Then I cut a scalloped oval 'doiley' from white card which was adhered to the card front with foam pads. A plain white oval (embossed after cutting) shadowed with a gingham patterned paper oval holds the 'Precious One' sentiment which was cut from Papermania shimmer cardstock. I added a bow, a floral arrangement and a smattering of pearls to complete the card.
Have you guessed which cartridge I used yet?
It was Lacy Labels!!!
Carts used:
Card base, and doiley topper- Lacy Labels
Ovals-Storybook
Precious One- Phrases
Thanks for dropping by!
Heather xxx

17/10/2011

Thanks A Ton!........

I've really dug into the murky depths of my card photos for this one! I made this card yonks ago and for some reason haven't posted it. This one was really quick to put together, and I used mostly scraps from my paper offcuts stash. The paisley patterned paper was quite Indian looking (although from the size of the ears that's an African elephant!) but I think it works. The elephant was cut from tan cardstock (don't know of any brown elephants!) and the word art from brown, turquoise and tan cardstock. Both elements were adhered with foam pads. I added some blue and brown Card Candi to finish. No ribbons & flowers on this one so it could be given to a guy.
Cart used:
Elephant & word art- Everyday Pop-Up Cards
Thanks for dropping by!
Heather xxx

13/10/2011

Polar bear kisses.......

I have had the cart  with this cute bear on forever,  but have never cut him out. WHY??!!! He's absolutely gorgeous! The fab papers on the front of the card are from a book called Christmas Card Ideas by Papercraft Inspirations that I picked up from W.H.Smith's. There are 149 card ideas, plus 24 A4 double-sided papers (on good quality paper, not cheap shiny stuff) and templates for £7.99. I used two different designs for this card, and the kissing polar bears on the paper above the ribbon are uncannily like the little chap on the scalloped oval. I cut the scarf from a scrap of spotty paper. The polar bear was cut from white glittercard then adhered to the scalloped oval with foam pads. I added a Safmat sentiment, some punched glittercard hearts and a poinsetta and punched holly leaves to finish.
Carts used:
Polar bears-Joys Of The Season
Scalloped oval-A Child's Year
Oval-George
Thanks for dropping by!
Heather xxx

12/10/2011

Amy.......

I hear a collective sharp intake of breath! Surely your eyes are deceiving you? Is that a STAMPED image on one of HEATHER's cards?!!! No you don't need to go to Specsavers, for 'tis true! That IS a stamped image, but I didn't stamp it (although I did colour it!) It was one image from a pack of  LOTV images given free with a mag, and the little cutie looks just like one of the GirliezNext Door, Amy, who was 8 yesterday. I coloured it with Papermania permanent markers (not too badly!) cut around it leaving a narrow white border, then mounted it with foam pads to an embossed circle, which in turn was adhered to a scalloped circle. The card base is what I call a twisted side step easel. These cards are easy to make:
*Fold a piece of A4 cardstock in half (to A5) then cut down to 8"x4"
*With the fold at the top, make a mark at 4" top & bottom
*Open the card out, keeping the fold at the top, then using a craft knife cut down between the marks,   creating two 4x4 panels
*Cut the right hand panel down to 4"x3" , then score across at 1 1/2" creating a 1 1/2"x 4" tent fold easel
*On the left hand panel ,score diagonally from the top left to bottom (centre) right, crease along score line
*Cut a piece of cardstock 4"x4"
*Apply adhesive to the triangular left-hand section and adhere square piece of cardstock
Back to my card, I used Dovecraft Forever Friends papers to cover the base and both the twisted & side- step panels. I created a stop for the two panels with a piece of punched cardstock, decorated with a contrasting strip of paper and ribbon. It was adhered to the base of the card with foam tape. 'AMY' was cut from glitter cardstock, shadowed (by hand) with pink cardstock then adhered to the border with foam pads. The scalloped circle with the LOTV image on it was adhered to the square panel with foam pads, and a scalloped oval holding the 'happy birthday' sentiment was adhered to the side step. A ribbon bow, some punched flowers and a little glitter completes the card.
Carts used:
Scalloped circle- Winter Woodland
Scalloped oval/Happy Birthday- A Child's Year
Circle & Oval- George
AMY-Lyrical Letters (Jumbo font)
Phew!!!
Thanks for dropping by!
Heather xxx

10/10/2011

Rhea......

This is the second card that I sent to Australia last week, this time for Rhea, the second daughter of our very good friends. The papers that I used on this one were First Edition Love Letters paper, and the figure was cut from Papermania Shimmer cardstock. I added a strip of sheer satin-edged ribbon running vertically down the front of the card behind the figure. She was adhered to a shaped panel to the front of the card. 'Rhea' was cut from pink shimmer cardstock and adhered vertically on the card with foam pads. A smattering of pearls and a floral arrangement in the top right hand corner of the panel completes the card.
Carts used:
Figure/Rhea- Art Nouveau
Shaped panel-StoryBook
Thanks for dropping by!
Heather xxx

08/10/2011

Kabir Construction......

The adorable son of some friends has his 6th birthday today. Happy Birthday Kabir!! This truck reminds me of  a Tonka Truck (anyone remember them?!) and what little boy doesn't like dumper trucks? This one was so easy to make. I cut and assembled the dumper truck, from Bazzill cardstock and silver mirri. I added a number 6 adhered with foam pads, and 'Kabir' and 'construction' cut from blue & black cardstock and adhered flat. The completed truck was adhered with foam pads to a grey shadow. Then I adhered the shadowed truck to a side folded C5 card placing the front of the truck slightly overlapping the fold in the card, then cut around it leaving a small border. Voila! A dumper truck-shaped card!  Happy Birthday cut from black cardstock was adhered inside the card.
Carts used:
Dumper truck/Kabir Construction/6- Boys Will Be Boys
Happy Birthday (not shown)- A Child's Year
I think I'll be making more of these!
Before I sign off I'd like to thank the ladies who came to the Swarm today. They made some great cards and we had a great time!
Thanks for dropping by!
Heather xxx

07/10/2011

Anniversary Wishes.......

My brother Nick and his wife Lisa celebrated their wedding anniversary yesterday, and this is the card that I sent them. I used a C5 card cut down to a  5" wide tent-fold. Papers were First Edition 'Daydream' 8x8 with the addition of brown glittercard, Bazzill, brown satin ribbon and a Prima bloom. I edged one of the papers with a MS heart punch, wrapped it with satin ribbon, then adhered it to the second piece of paper. This was then adhered flat to the front of the card. Two hearts were cut from purple spotted paper and shadowed with brown Bazzill. The silhouettes were cut from brown glittercard, then adhered to the hearts with foam pads. The completed hearts were then adhered at a slight angle to the card, overlapping the top slightly (when making a card like this always have the envelope to hand so that you can ensude that it will fit) A trio of punched hearts were adhered to the top of the large hearts. The sentiment and names were cut from glittercard and adhered flat. A couple of teeny punched hearts, a bow and lilac Prima bloom completes the card.
Carts used:
Hearts/silhouettes/Happy Anniversary- Sweethearts
Nick & Lisa- Lyrical Letters
I'm hosting a Swarm tomorrow- always a fun time!- so as per usual for all you ladies out there who are attending, here is a list of the carts that I've used for the samples:
Any Christmas carts (including the new Jolly Holiday Lite)
Wild Card
Just Because Cards or any carts with shapes suitable to make a base card i.e Lacy Labels/Elegant Edges
Beyond Birthdays
Art Nouveau *NEW*
Ashlyn's Alphabet
Inspired Heart
George
Heritage
Wedding Solutions
Doodlecharms
As ever, carts will be available to use on the day. If anyone has the Batman cart can you please bring that too!
Thanks Ladies- see you tomorrow!
Thanks for dropping by!
Heather xxx
04/10/2011

Tara.......

This is one of two cards winging their way to Australia..this one is for Tara, our niece who's birthday is tomorrow -Happy Birthday Tara!- the other one is for our friends' daughter, but that is for another day!
For Tara's card I used my fave 'cart of the moment' and First Edition papers. The card is a standard C5 with the front cut down to 3 1/2"  The figure was cut from Papermania shimmer cardstock- by the way, these figures are a dream to put together- then adhered to a shaped panel with foam pads. I added a ribbon trim & bow embellished with a  WOC cherry blossom bloom. 'Tara' was also cut from shimmer cardstock and adhered vertically with foam pads. A smattering of pearls completes the card front. I added a smaller shaped panel inside the card to write a greeting on.
Carts used:
Figure & 'Tara'- Art Nouveau
Shaped panel- Mother's Day Seasonal Cart
Thanks for dropping by!
Heather xxx

01/10/2011

Happy Birthday Caroline......

This card was one of three in a commission for a lady who orders lots of cards from us (Jendenink Craftworks). The other two were for her son and daughter-in-law. this one is for her daughter. She asked for a fun card, in shades of blue and with either a cooking or gardening theme. I chose to go with a cooking theme as I had just the right cartridge. The papers are from a 6x6 pad by Melissa Frances called 'Kitchsy Kitchen' from Dunelm Mill. As the card is C5 size I had to piece the papers together to fit the front of the card. I covered the join in the papers with a border cut from a piece of contrasting paper wrapped with ribbon with an added bow. All the elements on the card were cut from blue, white & silver mirri card with a little glittercard thrown in for some bling. The sentiment was adhered to a large panel off-set on the card front, with the recipients name adhered beneath, and the apron, oven glove and retro mixer were adhered around the edge with foam pads.
Carts used:
Mixer, apron & oven gloves- Nifty Fifties
Happy Birthday- Wild Card
50th & Caroline- Lyrical Letters
Thanks for dropping by, and enjoy the glorious weather this weekend 'cos it won't last forever!!
Heather xxx

28/09/2011

On the Christmas Card bandwagon......

 ....well, everyone else is at it so why not me?!! I don't normally show Christmas cards (well not many) on my blog because most of the cards that I make are destined for Workshops or Swarms, but I was so chuffed with these that I wanted you to see them. For my faithful ladies, they will be available to make at the next Workshop/Swarm, and you will get the usual instructions! Now, the two C5 cards can be made on the Expression & Create (using the portrait function) but not the Original Bug (the frames will cut too small), but the square card with the circular aperture frame CAN be made on the OB. Not many of my ladies have the OB but I still like to make a version that they can create too.
The gold card on the right was cut from gold mirri and plain white cardstock (the front of the card is mirri, the back, white) The white card was scored across the scallops and adhered to the mirri card to make the base card. I added a frame with oval aperture cut from red mirri and Papermania paper. Red satin ribbon was adhered to the bottom of the frame before it was fixed over a contrasting piece of patterned paper adhered to the front of the card, with foam tape. The top of the aperture was decorated with punched poinsettas, white 'helibores' created from small Papermania punches, mini 'helibores' created in the same way, and holly & ivy leaves (punched again with Woodware/Dovecraft punches). Yellow pearls were added to the centres of all the flowers and holly berries (pearls coloured red with a permenant marker) were adhered below the helibores.
The 'Holly & The Ivy' sentiment was computer generated onto Safmat using CAC Pinafore font (free from Dafont.com),carefully cut out and adhered inside the aperture. You could replace my choice of sentiment with one of your choice. Mine was chosen to go with the papers & embellishments. All the frames were decorated the same.
Carts used:
Gold card base- Just Because Cards (there is an almost identical one on A Child's Year)
Oval aperture frame/circular aperture frame- Ashlyn's Alphabet
Before I sign off, could I just make an appeal to any ladies coming to my next Swarm on October 6th? If anyone has the Batman cartridge could they please bring it with them as one of the ladies would like to borrow it to make a Batman card for a little boy who wants to be Batman when he grows up!
Thanks!
Heather xxx

27/09/2011

A car for Louie...

 One of the little BoyzNextDoor had a birthday on Saturday, and this is the card that I made for him. He had Robots last year, this year Disney Cars. The card base is a side fold horizontal C5 made with a piece of A3 cardstock cut to size. I like tent fold C5 cards but they can collapse under the weight of heavy embellishments, so I like to make them so that they fold at the side. They are much more stable. I cut McQueen from red, black, white, orange, yellow & silver cardstock. I made sure that he would almost fill the front of the card as I wanted to make a cut-away card. When I had adhered all the pieces together (why are these Disney cuts so flamin' fiddly?!) I adhered McQueen to the card front with foam pads, then cut around him leaving a small border. The inside back of the card was covered with a red/black mat with rounded corners.
'Happy Birthday' was cut from black cardstock and adhered flat. 'Louie' was cut from holographic cardstock then adhered with foam pads. I added a speed embellishment to finish (sorry for the fuzzy photo!)
                                                                         Carts used:
McQueen & 'Speed'- Disney Cars
Happy Birthday- A Child's Year
Louie-Robots
Thanks for dropping by!
Heather xxx

23/09/2011

Paige.....

My hubby called me on Monday and said "Speak to Debbie" (she's one of his secretaries)" she needs a birthday card...." So I speak to Debbie and she wants an 18th Birthday card for her daughter for FRIDAY!!! (today). Bearing in mind that the card had to go to Slough in Berkshire that was a pretty big ask!
Anyhow, she gave me all the deets and this is what I came up with. It was in the post Tuesday morning!
I used My Mind's Eye ' 'Penny Lane' papers on an A4 card base. Paige is a fashion design student so I thought that the dress form was rather appropriate. I added some dark teal satin ribbon, a deep pink Prima bloom and some pearls coloured with permanent pens to match the pink mats.
Carts used:
Dress form & dress- Formal Occasions
Happy Birthday- Wild Card
18th & 'Paige'- Lyrical Letters
I've yet to hear whether Debbie & Paige liked the card. I'll let you know!
Have a great weekend!
Heather xxx

19/09/2011

Beautiful......

Here's another of the heads from the Art Nouveau cart. I altered this one a bit, as there was a HUGE flower joining the head to the outer ring. I didn't like it so I carefully cut the flower from each of the cut pieces and replaced it with a romanesque pearl headdress and a WOC bloom. Now I like it!  I added some teeny punched leaves and flowers to the circle frame as a finishing touch. The punched border is a Dovecraft punch, wrapped with pink satin ribbon topped with a bow. 'Beautiful' was cut from green shimmer cardstock, shadowed with white. A smattering of pearls completes the card.
Carts used:
Head- Art Nouveau
'Beautiful'-Home Decor
Thanks for dropping by!
Heather xxx

18/09/2011

Lovely......

Here's another beautiful image from the Art Nouveau cart. She's one of four standing/sitting figures. I cut her from pearlised cardstock and adhered her with foam pads to an embossed panel. The card was created by cutting 1" from the front of a C5 card then punching the edge with this lovely Woodware Border Punch . I backed the punched edge with more pearlised cardstock then trimmed away the excess. The papers are from DCWV Mango stack. 'Lovely' was cut from pearlised cardstock using Font 1 on the cart and adhered flat to the inside back of the card. I finished the card off with some pearls and a WOC bloom.
Cart used:
Figure & 'Lovely'- Art Nouveau
Thanks for looking!
Heather xxx

17/09/2011

Beautiful dreamer.....

This dreamy card was made with my latest aquisition, Art Nouveau. OMG! This cart is TO DIE FOR!!!
I can't tell you how I've wished for a cart with these kind of images on, and I have to tell you they are stunning. They are very easy to cut out and put together. I've made three cards so far with this image, and another one with a different head. Besides the heads (there are four in all)  there are four standing/sitting figures, numerous images including a dragonfly and scarab beetle, William Morris style flowers and two fonts! I have made two Christmas cards using this image and they are very easy to adapt. I'll show you those at a later date as they are for my Christmas Workshop, and my ladies get first look! I used Papermania's Rose Garden (??) papers for the card base which measures 8" x 5", and shimmer cardstock for the image. I prettied up the headdress with a Prima mini rose and some punched mini leaves. I added more punched leaves and teeny punched flowers to the circle frame. The pretty punched border is a Woodware border punch, which was embellished with pink satin ribbon and a bow with a jewelled hat pin pushed through it- I always stick a silver bugle bead on the end of the pins to make them safe to post- and a small Prima rose. 'Dream' was cut from pink shimmer cardstock, adhered to cream shimmer cardstock, then hand cut to create a shadow. It was adhered to the card with foam pads. A smattering of pearls completes the card. The Art Nouveau cart is available from craftsulove.co.uk and costs £49.99. They have sold out once and have re-stocked but I wouldn't wait too long if you want to get it as I can see it flying off the shelves again!
Carts used:
Art Nouveau Head- Art Nouveau
Dream- Graphically Speaking
Thanks for dropping by!
Heather xxx

15/09/2011

Delighted!......

This card is super simple with a lot of white, and a splash of colour in the centre. The white mat was layered onto black & hot pink cardstock. The shaped panel was cut twice from patterned paper, then one piece was cut in half horizontally and adhered to the other piece with a piece of punched cardstock adhered over the join in the papers. The completed panel was adhered to another plain white cardstock piece to give stability , then affixed to the centre of the card with foam pads. The elegant chandelier was cut from hot pink glittercard - it cut like dream!- and adhered to the shaped panel with foam pads, then topped off with a bow and a WOC bloom. 'Delighted' was cut from black glittercard and adhered flat. A smattering of gems completes the card.
Carts used:
Shaped panel- Just Because Cards (there are some super shapes on Storybook too)
Chandelier- Everyday Pop-Up cards
'Delighted'- Winter Woodland
Thanks for dropping by!
Heather xxx

12/09/2011

Glam!....


These fold back cards are THE easiest cards to make and they give you so much room to be creative in- you have the front AND the inside of the card to decorate. For this one I used a piece of A4 cardstock folded to A5 the cut down to just under 6" square. I folded the front of the card back on itself and rounded the corners on the back of the card. I used Paper Cellar 6x6 monochromatic papers to cover the inside back and the folded back front of the card. I adhered the papers flush with the edges of the card so that no matting & layering was required- simples!
I did add a smaller, thinner panel to the folded back section because I wanted to add ribbon & a bow- difficult to do when the paper is applied flush- and it was adhered with foam tape. The shaped panel cut from black textured cardstock and patterned paper was adhered to the front with more foam tape. A layered circle holds a nail polish bottle, a hot pink lipstick cut from black dotted mirri, holographic silver card and hot pink mirri card and the 'Glam' sentiment . Teeny punched flowers and a Prima bloom completes the front of the card.
                                        
The inside back of the card was decorated with another shaped panel embellished with more punched flowers and leaves, and the 'Happy Birthday' sentiment, all adhered flat.
Carts used:
Shaped panels- Just Because Cards
Scalloped circle- Winter Woodland
Plain circle- George
Nail polish/Lippy/'Glam'- Forever Young
Happy Birthday- Wild Card (RDS on)
Thanks for dropping by today!
Heather xxx

10/09/2011

Groovy!......

Our very good friend Adele is celebrating her 50th birthday. She had a party last weekend (we couldn't go because we were in Rome) which was 60's/70's themed, so I thought that this 'groovy girl' image would be great for her card. I used g.c.d paper for the background and some fab 'oil-on-water' paper for the front panel. All of the elements were cut from glittercard and adhered to the card with foam pads. I added an acrylic flower to the hole on the '50', and a couple of large blooms adhered beneath the top corner of the front panel.
Carts used:
Groovy girl/Groovy-Groovy Times
'50' & 'Adele'-Life's a Party
'at'-Base Camp (or any font cartridge)
Thanks for dropping by!
Heather xxx

08/09/2011

Twenty one today, twenty one today!..........

...you've got the key of the door, never been twenty one before! No, not me! Number One son is 21 today. Where on earth do all the years go? He's gone with his girlfriend and two other 'girl' friends to Bestival on the Isle Of Wight today for four days. Hopefully the weather will hold out, although I wouldn't bet my life on it!. Anyhow, a music festival wouldn't be the same if it didn't tiddle down with rain, and the kids came back smelling of roses would it? Four days without a shower! RANK!!!!
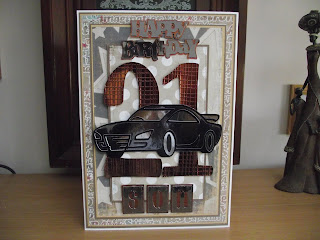
Krishnan (no 1 son) loves fast cars so I thought I'd use one on his card this year. The card is A4 in size and I used MME papers from the All Boy stack. I used a combination of brown, silver, gunmetal and black mirri for the cut elements. The large 21 was embossed with a Fiskars texture plate, and the car was adhered over the top of them with foam tape. I added a 'Happy Birthday' sentiment and 'SON' letter squares.
Carts used:
'21' & 'SON' squares- Don Juan
Car- Father's Day Seasonal
'Happy Birthday'- Stamping Solutions
Thanks for looking!
Heather xxx