29/08/2011

Bloom Criss Cross.....

 Hope you are all having a great Bank Holiday..for a change the weather has been quite good! I had a happy accident with this card! That rather voluptuous vase was cut from pink shimmer cardstock, then embossed. Only it wasn't embossed was it? No, I debossed it instead! DUH!  'Oh Poo' says I (or words to that effect) Then I had a lightbulb moment. I reached for a white gel pen and filled in the debossed area and I was really pleased with the finished result. I added a pearl to the centre of each of the flowers and it looks really pretty. I added punched flowers over the flowers that were cut with the vase. I use Papermania punches for my teeny flowers and leaves. The garden themed paper was from my stash (don't know who made it) and the green checked/spotty papers were from  6x6 magazine freebie pads.
I added a shaped panel & the word 'bloom' to the pocket, and the insert was decorated with a 'Happy Birthday' sentiment and a smattering of punched flowers. A WOC bloom and a ribbon bow completes the card.
Carts used:
Shaped panels/insert & 'bloom'- Just Because Cards
Vase of flowers-Kate's ABC
'Happy Birthday'-Calligraphy
Thanks for dropping by!
Heather xxx

26/08/2011

Amber's turn......

Hi folks. It's the turn of Amber's card today. For Amber I made a square card using yonks-old papers I dug out from my stash- they were perfect for this card! The model was cut from black glittercard and adhered to the shaped panel (which sits on a ribbon-trimmed punched border) with foam pads. The front of the card was finished with a pink daisy, some punched flowers, and a trio of black gems
                                     
The outside of the pocket was embellished with an plaque bearing Amber's age, and the insert holds a black glittercard 'Happy Birthday' and pink glittercard 'AMBER'. The insert was finished with a pink ribbon bow.
Carts used:
Model & shaped panels- Forever Young
Ovals- George
Shaped insert- Just Because Cards
Happy Birthday- Wild Card
AMBER & 17- Winter Woodland
Thanks for looking & have a great Bank Holiday!
Heather xxx

25/08/2011

Lisa's turn.......

 As promised yesterday here is the card that I sent my SIL Lisa for her birthday. This one is a C5 card made in the same way as Terri's, but this time I used First Edition 'Breeze' papers. All the elements are the same except for the dress.
I added a 'totally you' sentiment to the small oval on the pocket along with some punched flowers, which I also put on the tag. The card was finished with a lovely coffee coloured rose from Prima and a smattering of pearls.
Carts used:
Shaped ovals- Forever Young
Plain ovals-George
'Totally You' -Stamping Solutions
Dress-Formal Occasion
'LISA' & tag- Winter Woodland
Happy Birthday- Phrases
Amber's turn tomorrow!
Thanks for dropping by!
Heather xxx

24/08/2011

Birthday criss-cross......

 Yesterday it was both my niece Terri's and my SIL Lisa's birthdays, and today it is the birthday of our friends' youngest daughter Amber, so I've had a marathon, super quick card making session before a trip to Wigan at the weekend! I managed to get Terri & Lisa's card posted on time but was a day late with Amber's. Hopefully she'll receive it tomorrow. I'll show you the other two cards over the next couple of days. Back to Terri's card, I made a C5 criss cross card (using two cards cut on the diagonal and adhered together at the back) I used old papers  from Creative Cardmaking (I managed to find a scrap of teeny polka dot that matched for the shoes), black mirri, a punched border, flowered sheer ribbon and a polka dot Prima bloom.
The insert card is a large tag with a Cuttlebugged white layer which holds the 'Happy Birthday' sentiment. I added a bow to the top, and some punched flowers to the bottom corner. 'TERRI' was cut from polka dot paper and adhered flat across the pocket on a white punched border along with a couple of teeny punched flowers .
Carts used:
Shoes & shaped front panel- Forever Young
Tag & 'TERRI' - Winter Woodland
Ovals- George
Happy Birthday- Phrases
Thanks for dropping by today!
Heather xxx

22/08/2011

Silver criss-cross Anniversary......

 Well folks, I told you I had a new obsession and I wasn't joking! I've got quite a few of these cards to show you and this is no.2. I made the card base in exactly the same way as the previous card, and I used a mixture of papers from Papermania and Debbie Moore freebies from Creative Cardmaking mag. I made the fronts of the card two-tone using two different papers, punching the bottom edge of the top paper with an MS border punch. A scalloped oval holds the number '25' and some punched/embossed flowers made from silver mirri, with silver pearl centres. 'Anniversary' was cut from silver mirri and adhered flat below the punched edge of the top paper.
The insert card was cut from silver mirri with patterned paper and pearlescent paper layers. 'Congratulations' was cut from silver mirri and adhered flat. A silver bow and pearl-centred flower was adhered to the top of the insert. For a finishing touch I added another scalloped oval with the world 'silver' cut from mirri, and some teeny punched flowers and leaves, to the pocket.
Carts used:
Scalloped ovals- A Child's Year
Plain ovals-George
Shaped insert card- Just Because Cards
'25'- Winter Woodland
'Silver'- Heritage
'Congratulations' & 'Anniversary'-Sweethearts
Thanks for dropping by!
Heather xxx

16/08/2011

A new obsession!.......

I have to tell you that I have a new obsession - what's new I hear you cry!...criss-cross cards, and I'll warn you now that you'll be seeing LOTS! I've made them before but they seem to be popping up on blogs again so I thought I'd make one..or two.. or three..........!
I made the card base by cutting two A5 cards down to squares,
 cutting the front of each card on a diagonal after measuring 6cms up from the bottom edge. The backs of the cards were adhered together to create a criss-cross card. I then decorated it using some very old paper (I only had a scrap left) and some Pink Petticoat paper for the pocket front ,the back panel and the border. I added a punched border in contrasting black cardstock, trimmed with spotted PP paper and black velvet ribbon. The border was adhered to the card with foam tape. I cut a shaped panel from pink cardstock shadowed with black,  and the pale pink oval was embossed. A pair of killer heels cut from silver mirri and black glittercard was adhered to the oval with foam pads. I finished the front of the card with a bloom and some teeny punched flowers.
The inside of the card was decorated with another shaped panel with a Safmat sentiment- 'You don't have to walk the red carpet to wear fabulous shoes'- which was adhered flat and embellished with a couple of punched flowers. The insert card was created from black cardstock with a smaller white panel adhered to it. It was trimmed with an offcut of PP paper, and the sentiment, cut from black & pink cardstock was adhered flat. An eyelet was inserted in the top of the insert and a piece of ribbon tied through it. Three punched flowers complete the insert.
Carts used:
Shaped panels & shoes- Forever Young
Ovals- George
'Happy Birthday'- Phrases
Thanks for looking!
TTFN!
Heather xxx

15/08/2011

For Kathleen...

I want to thank Kathleen from Arizona who left me a lovely comment on my 'Summer Fun Waterfall'  post. I really appreciate it and it makes what I do worthwhile if I inspire someone to be creative! Kathleen, to become a follower, click on the 'Join This Site' icon above my followers, then sign in with any of the ID options. If you don't have any of them just create a Google account (click on the link on the same page) follow the instructions, then you'll be able to follow me.
Hope this helps!
Heather

Australia, here we come!.........

Well, we had a lovely time in Wales at the weekend. We went to say goodbye (for now!) to our very good friends' youngest daughter Rhea who is off to Australia with her boyfriend Phil tonight. They are both doctors and are going to work in Melbourne for a year. There will be buckets of tears at Heathrow tonight that's for sure!
I made this card for them, and I have to say I was chuffed with it! I bought the Phrases cartridge a few weeks ago and couldn't believe it when I saw this Australia cut in the handbook! The phrase above the 'land mass' cuts as 'Australia Day' , but I didn't want that, so I cut off the 'day'. I cut Australia and both phrases from textured cardstock. The layout was very simple and I used earthy colours, using paper from DCWV and threw in some turquoise to represent the ocean. I added a silver aeropane and an Aussie flag downloaded from good old Google Images (always a great image scource for crafters!) printed onto matt cardstock and cut out. All of the elements were adhered with foam pads. I finished off with some glitter on all of the turquoise areas.
Carts used:
Australia land mass & 'Australia'- Phrases
Aeroplane- Going Places
Here we come!- Base Camp
Flag downloaded from Google Images
Thanks for dropping by!
Heather xxx

12/08/2011

Summer Fun Waterfall......

 Want to see another waterfall? Here's a bright and sunny one for you, made with DCWV Citrus papers. Page 1, a teeny blue bikini (wish I could get into THAT!).....
 ..page 2, a pair of bright flip-flops.....
 page 3, a pair of funky sunnies....
page 4, a sunny sentiment with an additional greeting, computer generated onto Safmat, on the pull.
I added some thin ribbon, a layered bloom, and some punched flowers.
Carts used:
Bikini, flip-flops, sun & 'fun in the sun' sentiment- Life's A Beach
Sunglasses- Forever Young
Have a great weekend ! I'm off to Wales tomorrow!
Heather xxx


10/08/2011

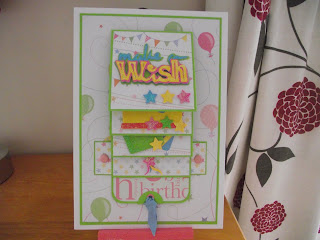
Make A Wish Waterfall..........

 I've got another waterfall card to show you today. This one is decorated with lovely papers from Papermania's Happy Birthday 12x12 pack. This one works vertically. Page 1 holds the 'Make A Wish' sentiment...
 page 2, a yummy cake with fat candles....
 page 3, prezzies....
and finally, page 4 a trio of colourful balloons...
I added a few punched, glittercard stars as a finishing touch.
Carts used:
Make A Wish- Phrases
Cake & prezzies- Simply Charmed
Balloons- Doodlecharms
Thanks for dropping by!
Heather xxx

07/08/2011

'Craft Stash' money box......

I hosted a Swarm yesterday, and I gave all of the ladies who attended a project pack providing the bare bones needed to create this pretty little money box which can be used to collect all those little odds'n'sods of loose change which can be spent on oodles of crafty stuff!
For my sample I cut and 8 3/4" box from plain white medium weight cardstock,
 four 2 1/2" squares of patterned paper,
one rectangle of cardstock 2 1/2" x 5 3/4" for the back panel
 one 1 3/4" silhouetted rectangle from white textured cardstock for the money slot
  two 2 1/4" scalloped circles from white textured cardstock,
 two 1 3/4" circles from coloured paper 
 one 1 " circles and  one 1" pound sign from gold mirri.
One 'my craft stash' sentiment computer generated onto Safmat (CAC Pinafore font from DaFont.com)
I adhered the paper squares to three box sides and the top of the box. The silhouetted rectangle was adhered to the top of the box and the paper within the frame was removed with a craft knife to create the money slot. A piece of patterned paper slightly smaller than the back panel was adhered to the panel after rounding two top corners of each piece. The box was scored, folded and adhered together with PVA glue leaving one flap open (the one with the slot cut into it) I cut away two smaller slots on the flaps inside the box as they block the coins falling through the slot.The back panel was affixed to the back of the box, again with PVA. The plain paper circles were adhered to the scalloped circles then I applied the Safmat sentiment to one of them and the gold circle with the pound sign adhered to it, to the other. Both completed circles were adhered to the box with foam pads. I made this box quite feminine, but you could easily butch it up for a boy by changing the shape of the back panel and adding a different sentiment. This size box can only be created on the Expression using a 12x12 mat, but an even bigger one can be made with the 12x24" mat and a piece of A3 cardstock using the 'Fit To Page' function. When using 'Fit To Page' for any project, always make a note of the resulting size (shown in the display before cutting commences) then you can always be sure that each cut , when making multiples, is the same size, without using the FTP fuction.
Carts used:
Box- Bags, Tags, Boxes & More
Paper squares,silhouetted rectangle (money slot) & circles- George
Scalloped circles- Winter Woodland
Pound sign-Ashlyn's Alphabet
Thanks for dropping by!
TTFN
Heather xxx

06/08/2011

Cake Is For Wimps!........

Isn't that a great sentiment?! I found a stamped version of this card whilst either blog hopping or perusing a crafty mag.... can't remember which!...and wanted to 'Cricut' it.
 As it happened, No2 Son's friend Owen had a party yesterday evening and I thought that it'd make a great 18th birthday card -who needs cake when you can legally drink right?!
So I made a z-front card using DCWV Natural Stack papers, mirri card and white glittercard. I hand cut three candles, cut slits in the 'foam' and tucked them inside. The 'foam' was then adhered to the beer mug with foam pads. I created a panel to fit the front of the card and adhered the mug to it.
'Cake is for wimps' was cut from black glittercard and adhered to the panel with some letters slightly overlapping the cut element. The completed panel was adhered to the folded front of the card.
 
The inside of the card was decorated with a plain white panel matted onto patterned paper, then adhered flat to the inside back of the card. The sentiment was created from black glittercard and copper mirri and adhered flat to the white panel.
Carts used:
Beer Mug- Everyday pop-Up Cards
Sentiment, '18th' & 'Owen'- Don Juan
'Happy Birthday'- Stamping Solutions
Thanks for dropping by today!
TTFN
Heather xxx

03/08/2011

Built Tough!.......

 I remember both of my brothers playing with Tonka toys when they were little - can you still buy Tonka Toys?-and these cute, chunky vehicles reminded me of them..Tonka toys that is! I thought that they'd be great on a waterfall card and this is the finished article. I used K&Co 'Itsy Bitsy' boy 8x8 papers and textured cardstock and some Card Candi. The first 'page' is a 4x4 truck....
 ....second 'page' is a pick-up.....
 ...third 'page' is a dumper truck....
....and the final page is 'Built Tough' word art. I added a Safmat sentiment from my stash as an extra little surprise for the birthday boy!
I've got a cute little girl's version to show you too...but that's for another day!
Cart used:
Vehicles & word art- Boys Will Be Boys
Thanks for looking!
TTFN
Heather xxx

01/08/2011

You Did It!........

Well, it's almost that time of year, where kids up and down the country are chewing their fingers off waiting for GCSE/A Level results (including one under this roof!) and I'm sure more than a few will be getting Congrats cards. I made this one with school/college leavers in mind rather than Uni graduates. There are no mortar boards or diplomas- just a stonking great sentiment! The colour scheme would suit a boy or girl recipient. The papers are Papermania 'Happy Birthday' Collection 12x12 papers. I used a large dot print and a multicoloured star print. I added a star punched border created with an EK Success punch, and it was adhered to the card with foam pads. The large, layered sentiment was cut from shimmer cardstock then adhered over the star border with more foam pads. 'Congrats' also cut from shimmer cardstock was adhered above the large sentiment along with some punched stars. I added some glitter for a finishing touch.
Carts used:
Congrats &You Did It!- Phrases
Thanks for dropping by!
TTFN
Heather xxx