18/01/2011

Little Monkey......


When I saw this cute little chap I knew that I'd need to use him on a kiddies card. I went back to a pop-out stepper for the base card and used DCWV Safari papers. The little monkey was cut from Bazill cardstock and layered up. He is cut complete with branch, and the tail doesn't look right as it isn't curled around the branch. So I manipulated the top layer of the monkey so that the tail curled around the branch making it look more realistic. I adhered him to the front of the card with a Papermania spring so that he wibbles!
I cut four large leaves for the side panels and adhered them with foam tape. The sentiments were cut from Bazill c/stock, layered up and adhered with foam pads. A touch of glitter completes the card
Carts used:
Monkey on branch & 'Little Monkey'-Life's A Party
Happy Birthday-ZooBalloo
Leaves- Life Is A Beach
Thanks for visiting!
Heather xxx

17/01/2011

The Key To My Heart........


I've another pop-up card for you today, this time a standard C5 card. I made a card similar to this for my latest workshop, but it was a square and in red mirri card for Valentine's Day. This card is a lot softer in tone as I couldn't resist this absolutely gorgeous Je t'adore paper by Making Memories. The colour palette is soft pinks, burgundy, cream and soft green.Just lovely. I also used cream shimmery cardstock from Coredinations Gemstones stack.The padlock and key, 'Darling' and 'Key to my heart' were embossed after cutting, and the two sentiments were shadowed with cream cardstock and adhered with foam pads. I added some sheer green ribbon and floral embellishments and a smattering of pearls. There is also a tag tucked into the upright portion of the card (you can just see the ribbon in the photo). A couple of shadowed swirls were added to adjescent corners to complete the card.

The front of the card was decorated simply with a punched border and a key added to a patterned paper panel. Simple but pretty.
Carts used:
Heart padlock, key, both sentiments- Sentimentals
Corner swirls- Heritage
Tag (tucked into side of card)- George
Thanks for visiting!
Heather xxx

13/01/2011

Pop-up cards....

This is long one folks!
I decided to try my hand at some pop-up cards and these were my first efforts and I have to say I'm chuffed with how they turned out. I was always put off making these because what do you do with the front of the card when all the work is on the inside? I decided to put minimal work on the outside-just enough to make you want to open the card-whilst concentrating all the effort for the inside.The outside of both cards are the same, only the colours are different.I used K&Co 'Itsy Bitsy' papers and Coredinations Gemstones cardstock which has a lovely shimmery sheen.

I just love these little baby in a pram icons. They look so cheeky and sweet don't they? As on the outside, the inside of the card are both the same, only the colours are different. The babies were cut from coloured card with white shadows and I added a little punched heart to the pram body. A punched, ribbon trimmed border with pearls, a layered bloom and a sentiment adhered with foam pads complete the cards.

In the picture below you can see a side view of the cards showing the pop-up section.

I showcased some cards similar to these yesterday in my new workshop and one of my ladies made a valid point- where do you write your greeting? So, on the spot, we decided to leave one side of the upright section of the card open (as in no adhesive applied)cut a notch with a circle punch and slide a little tag in. Angie (for it was she who posed the question!) did this as did Barbie and it worked superbly! Problem solved!
Carts used:
Baby icons-Car Decals
New Arrival-New Arrival
The Car Decals cartridge went down very well with my ladies! They couldn't stop using it!
Thanks for looking!
Heather xxx

11/01/2011

I'd rather be shopping!......


This woman is on a serious mission!..to SPEND,SPEND,SPEND!I think that this image is great. I did a little paper piecing to jazz it up a bit, giving her a patterned frock and some seriously trendy sunglasses.The sunglasses were created with a scrap of gunmetal grey mirri card (I can't tell you how much I love that stuff!)She has some very kissable lips too, created with a tiny heart punch.
The papers used on this card are Dovecraft's Forever Friends Spring A4 pack,and I added some hot pink polka dot ribbon to the card and to the slider.

The sentiment on the slider was created from pink cardstock which was glittered after being adhered to the slider.To complete the card I added a single rose and some leaves.
Cart used:
Shopper & sentiment-Car Decals
Thanks for visiting today!
Heather xxx

10/01/2011

Fixing up the place...


Here's another guy card for you today.I used a slider card for the card base and MME papers from the Complete Boy 12x12 stack.All of the elements(apart from the nails) were cut from silver mirri and Bazzill cardstock and adhered to the card front with foam pads. I added some ruler printed twill tape to the bottom of the card and the 'D.I.Y Expert!' sentiment was adhered flat to the slider mechanism

I added a couple of screw head brads to the front panel for that authentic handyman look!
Carts used:
All elements on front of card-Handy Man Cricut Lite
D.I.Y Expert!-Opposites Attract
Thanks for dropping by!
Heatherxxx

07/01/2011

Footy 'wobbly' slider......


We all baulk at making cards for boys and men but occasionally it's good to get out of your comfort zone and get the old brain-box working on something a little challenging. Personally, I don't often have a problem with male cards, but I know a lot of people do. It's sometimes hard to keep your hands off the ribbon and flowers and use something a bit more 'butch', and here I've gone down the footy route (you can't go far wrong with that CAN you?)
I used another slider base for this card with a little 'twist'. The little chap on the front of the card is on a 'boinger' spring- unfortunately you can't tell from the photo but it is such fun to see him wibble! A kiddie could spend hours playing with this little chap! I used a Dovecraft A5 paper pack from last year, choosing 3 designs. The pitch paper was put inside the card, the green football paper on the outside and the black & white football paper on the slider. I cut the little chap from black cardstock with a white shadow and paper pieced a footy shirt. I added a piece of green cardstock to the slider then adhered the character to it with a Papermania spring.I also added a football adhered with foam pads.

I cut 'score' from black card with a white shadow and adhered it to the 'pitch' along with some balls cut from the patterned paper remnant, and 'Happy Birthday' was cut from white cardstock shadowed with black. This was adhered to the bottom of the card with foam pads.
This card could be adapted for an adult by using more adult looking football-themed papers, and a sports character from the Sports Mania cart.
Carts used:
Little footy player-Car Decals
Score & football-Sports Mania
Happy Birthday-Zoo Balloo
Thanks for dropping by!
Heather xxx

06/01/2011

A new kind of card (for me, at least!)....


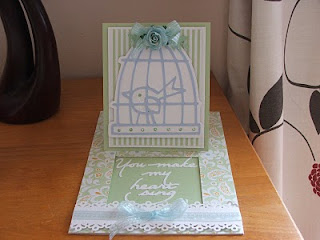
I tried a new kind of card the other day. It's not new in that it's never been seen before but it's new for me! I've tried to make one of these slider easel cards before but I made a right pigs ear of it! Then, when I was watching Cricut card videos on YouTube I came across a tutorial, then had a go myself and whaddayaknow! I made one straight off, no probs!

In the turorial 2 pieces of card were used to make the base card but I just used a C5 card, cut the slider, added the sentiment pull and decorated it. I used gorgeous papers from the A4 Forever Friends Spring Time stack and a cute birdy in a cage cut from blue cardstock shadowed with white. The birdcage was adhered to the front of the card with foam pads. I added a punched, ribbon trimmed border and a rose and ribbon bow to the top of the bird cage and gems to the base. The sentiment was cut from white cardstock and adhered inside the card (this is hidden when the slider is pushed down and revealed when the slider is pulled out as you can see in the photo)If you use a Cricut generated sentiment be sure that it is well adhered as the slider can become caught on it. You could, of course, stamp a sentiment if preferred.

These cards take up a little more room than a conventional easel card but they are such fun to make. I'm addicted!
Carts used:
Bird in cage-Car Decals
Sentiment-Wild Card
Thanks for visiting!
Heather xxx