10/01/2011

Fixing up the place...


Here's another guy card for you today.I used a slider card for the card base and MME papers from the Complete Boy 12x12 stack.All of the elements(apart from the nails) were cut from silver mirri and Bazzill cardstock and adhered to the card front with foam pads. I added some ruler printed twill tape to the bottom of the card and the 'D.I.Y Expert!' sentiment was adhered flat to the slider mechanism

I added a couple of screw head brads to the front panel for that authentic handyman look!
Carts used:
All elements on front of card-Handy Man Cricut Lite
D.I.Y Expert!-Opposites Attract
Thanks for dropping by!
Heatherxxx

07/01/2011

Footy 'wobbly' slider......


We all baulk at making cards for boys and men but occasionally it's good to get out of your comfort zone and get the old brain-box working on something a little challenging. Personally, I don't often have a problem with male cards, but I know a lot of people do. It's sometimes hard to keep your hands off the ribbon and flowers and use something a bit more 'butch', and here I've gone down the footy route (you can't go far wrong with that CAN you?)
I used another slider base for this card with a little 'twist'. The little chap on the front of the card is on a 'boinger' spring- unfortunately you can't tell from the photo but it is such fun to see him wibble! A kiddie could spend hours playing with this little chap! I used a Dovecraft A5 paper pack from last year, choosing 3 designs. The pitch paper was put inside the card, the green football paper on the outside and the black & white football paper on the slider. I cut the little chap from black cardstock with a white shadow and paper pieced a footy shirt. I added a piece of green cardstock to the slider then adhered the character to it with a Papermania spring.I also added a football adhered with foam pads.

I cut 'score' from black card with a white shadow and adhered it to the 'pitch' along with some balls cut from the patterned paper remnant, and 'Happy Birthday' was cut from white cardstock shadowed with black. This was adhered to the bottom of the card with foam pads.
This card could be adapted for an adult by using more adult looking football-themed papers, and a sports character from the Sports Mania cart.
Carts used:
Little footy player-Car Decals
Score & football-Sports Mania
Happy Birthday-Zoo Balloo
Thanks for dropping by!
Heather xxx

06/01/2011

A new kind of card (for me, at least!)....


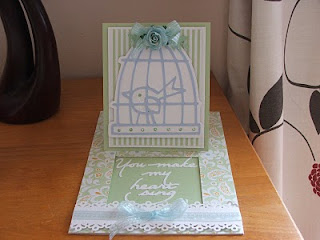
I tried a new kind of card the other day. It's not new in that it's never been seen before but it's new for me! I've tried to make one of these slider easel cards before but I made a right pigs ear of it! Then, when I was watching Cricut card videos on YouTube I came across a tutorial, then had a go myself and whaddayaknow! I made one straight off, no probs!

In the turorial 2 pieces of card were used to make the base card but I just used a C5 card, cut the slider, added the sentiment pull and decorated it. I used gorgeous papers from the A4 Forever Friends Spring Time stack and a cute birdy in a cage cut from blue cardstock shadowed with white. The birdcage was adhered to the front of the card with foam pads. I added a punched, ribbon trimmed border and a rose and ribbon bow to the top of the bird cage and gems to the base. The sentiment was cut from white cardstock and adhered inside the card (this is hidden when the slider is pushed down and revealed when the slider is pulled out as you can see in the photo)If you use a Cricut generated sentiment be sure that it is well adhered as the slider can become caught on it. You could, of course, stamp a sentiment if preferred.

These cards take up a little more room than a conventional easel card but they are such fun to make. I'm addicted!
Carts used:
Bird in cage-Car Decals
Sentiment-Wild Card
Thanks for visiting!
Heather xxx

05/01/2011

I Love My Nana.....


Here's another cute character card for you. Don't you think that this nana looks like she knows how to have fun?! I used an extended stepper card base and more papers from the A4 Forever Friends Spring Time pack. These papers are really lovely, pretty colours and patterns and very good quality paper. Grab them if you can! To make an extended stepper card take a square card for your base and a length of cardstock as wide as your card. Score it to create 2 mountain folds-the second fold should be taller than the first- add 1cm for attaching to the base card.Apply double-sided tape to the 1cm portion of the concertinaed section and adhere the base card to it.
The nana was cut at 4 1/2" from lilac bazzill with a white shadow and adhered to the centre fold of the card. I cut a scalloped square to fit the back of the card and added a square of yellow gingham paper matted onto lilac cardstock. The other panels were covered with alternating patterns of paper, the front panels having a ribbon and bow added. The sentiment was cut from lilac glittercard and a heart punched from pink. The sentiment was adhered flat and the heart raised with foam pads. I cut some little daisies from lilac glittercard (only because I broke my punch!), added yellow pearls to the centres and scattered them around the panels. I punched a tiny heart and added it to Nana's lips, gave her some pearl buttons on her dress and bag and blinged up her specs a la Edna Everidge! Go get 'em Nana!
Nana and sentiment-Car Decals
Scalloped square-Celebrations (scalloped tag cut with blackout enabled)
Daisies-George
Thanks for visiting!
Heather xxx

04/01/2011

I love my Mummy.....


OMG!!!! I have THE cutest cart EVAH! I aquired Car Decals a couple of weeks ago and if you think that all you can make is sticky-on things for your car windows,THINK AGAIN PEOPLE!!! This cart is packed with the cutest characters on planet Earth, from babies to toddlers, schoolkids to teens, mums & dads to grannies and grandads and not forgetting the cat, dog and goldfish! It also has relative phrases like 'my kids are better than your kids' (aren't they all?!)and some other decal type cuts. If you make cutesy or kiddy cards (or cards for kids to give) this is the one for you.
I chose this cute Mum for todays card. The paper is the new Dovecraft Forever Friends Springtime A4 pack. The card base is a z-fold cut to fit a 7 x 5" envelope.I cut the Mum from blue cardstock on a white shadow. I added a couple of punched hearts in different sizes (one on her lips and the other on her dress) and a pearl on her handbag.She was adhered with foam pads to the front panel over a ribbon trimmed punched border. A floral arrangement was added to the left hand corner of the front panel. 'I (heart) My Mummy' was created with blue glittercard and a large punched heart. The letters were adhered flat and the heart raised on foam pads. Three additional punched hearts were added to complete the card.
Carts used:
Mummy decal & sentiment- Card Decals
Another bonus with this cart is that it has the Cricut bug face on it!..3 diffrent versions no less!
Thanks for dropping by!
Heather xxx

03/01/2011

With Sympathy.....


Sadly.my hubby had to attend a funeral on Christmas Eve. The mother of a close friend died a couple of days earlier and he asked me to make a card. I chose a shortfall base card and a predominately white (a funereal colour in India)colour scheme with a splash of siver and pale blue.This card was simplicity itself to create. I used silver mirri and pearlescent white card which I embossed. I added a sentiment cut from silver mirri to the front panel along with a fancy corner and a Prima rose over a shimmering blue ribbon. A couple more fancy corners adorn the inside back of the card. I added blue pearls to the centres of all the fancy corners and to the ribbon.
Carts used:
With Sympathy-Wild Card
Fancy corners-Heritage
Thanks for visiting today!
Heather xxx

31/12/2010

Happy New Year and final Christmas card of 2010....


In the words of John Lennon..'another year over, and a new one just begun....' well almost!As promised this is my final Christmas card (finished by the skin of my teeth!)made for my hubby. As yesterdays card it is a shortfall front card made with DCWV Winter Stack papers.I really love this icy blue palette and continued it with sparkly reindeer. The snow on the front panel was cut from white glittercard and adhered to a panel cut strategically to incorporate a snowflake design. I added a jingle bell to the deer's neck with silver cord, then adhered the deer (ha!ha!) to the panel with foam pads. I computer generated the sentiments onto Safmat then adhered the sentiments to blue paper matted onto royal blue cardstock. I edged the sentiment panels with Cosmic Shimmer crushed glass glitter (love that stuff!) They were adhered to the panel with foam pads. A gem 'eye' on the deer and some gems in the top right hand corner of the card add a finishing touch. I computer generated a sentiment (not shown 'cos it's private!)and adhered it to the inside back of the card
Cart used:
Reindeer- Christmas/Noel
Happy New Year everyone, and I look forward to sharing with you in 2011
Heather xxx