29/11/2010

Nan's Cat.........

It's my Mum's birthday today (Monday)...Happy Birthday Mum!.....and these are the cards that I made for her. She has two beautiful cats-Milly & Molly-so I thought that a cat themed card would be appreciated. I used a pop-up stepper for the base card, Melody Ross-Lydia Collection papers by g.c.d,glittercard for the pussycat and some punched flowers. The sentiment is by Pink Petticoat...
For the card from hubby & me I used a bow front aperture card, Papermania papers, a beautiful full blown Prima rose,pearl strands and a verse printed onto Safmat to go inside the aperture.
Carts used:
Nan's Cat:
Cat & Bird on spade-A Child's Year
Scalloped circle & 'NAN'- Winter Woodland
Flourishes on side panels-Winter Frolic
Bow Front Aperture:
Scalloped oval frame-Ashlyn's Alphabet
'Mum'-Beyond Birthdays
Corner Flourishes-Heritage
Thanks for looking!
Heather xxx

26/11/2010

Candle-lit Christmas......

I've got another short-fall card for you today. I used that troublesome cartridge again...it's not often that I wish that I hadn't bought a cartridge but maybe this is one of them! If you don't use a relatively new mat, all the curly wurly bits get chewed up and you have to start again....and you can bet your bottom dollar that the chewin' up starts when the cut is almost complete, so you have to start again! Grrrr!!!!
Anway, back to the card. I cut the front down to 3 1/2" then adhered paper to the front and back. I cut a smaller rectangular panel and adhered the fillagree candle to it. The candle was cut (at the 3rd attempt!) from gold mirri, and I cut 2 more candles in pearlescent gold and red mirri card. I chopped them apart and adhered them to the back of the gold mirri candle. This was adhered to the smaller panel with foam pads. See that sentiment panel? If you look closer (click on the picture) you'll see that the sentiment was actually DRAWN! Some cuts don't survive if they are too intricate and being cut small. I have some Cri-Kit pens from Scappy-Go-Lucky UK , they are like mini gel pens, and you take the blade housing out, put the magnetic pen holder with the pen in it in it's place and press 'CUT'. The resultant image can then be cut by re-inserting the blade housing or (as I did) coloured in. I added some red Stickles to 'wishes' then adhered it to the card front. Some sumptuous ribbon, a poinsetta and some punched holly leaves complete the card.
Carts used:
Candle-Trim The Tree
Christmas Wishes (drawn with Cri-kit pens)-Winter Frolics
Thanks for visiting & have a great weekend!
Heather xxx

25/11/2010

Rockin' robin.....

Here's a cheeky chappie for you! This little chap is not a robin in the cartridge handbook, but I turned him into one! I cut him from brown, bronze and red glittercard and gave him a googly eye. He was then mounted with foam pads onto an embossed panel matted onto a scalloped rectangle. The sentiment was cut from red card then glittered. The papers are Papermania Festive Frolics (see how the robin looks like those on the paper!) I added a spotty bow, a poinsetta and a smattering of red gems to complete the card.
Carts used:
Robin & sentiment-Simply Charmed
Scalloped frame-A Child's Year
Thanks for visiting today!
Heather xxx

24/11/2010

Welcome Little One......

Just a quick one this morning 'cos I'm off to work later.... I haven't made a pop-out stepper for a while..these were the last two that I made..when I make baby cards I HAVE to make one for a boy and one for a girl. I used a variety of papers from my stash,gingham ribbon,layered blooms and an MS punch.
Some punched hearts and a smattering of pearls complete the cards.
Carts used:
Scalloped/plain circles-Winter Woodland
Nappy Pin-New Arrival
Dummy & sentiment-Simply Charmed
I cut the 'Welcome' part of the sentiment apart to allow it to curve around the edge of the circle.
Thanks for visiting today!
Heather xxx

23/11/2010

Fillagree tree......

Here's the other card made from the Trim The Tree seasonal cartridge, and I can tell you this cut was trouble! I tried glittercard (didn't want to know!) several times I tried mirri card (didn't like the curly-wurly bits!) and had to use a brand new mat (grrrrr!) to get a usable cut. Then the blackout didn't look right- the left hand side of the tree towards the bottom didn't match the right hand side. At first I thought that the cartridge was faulty 'til I looked at the leaflet that came with the cart- it was missing on that too! Well I didn't like it like that and quite frankly couldn't think why it should be like that. So I adhered the blackout anyway and added a piece of mirri to the 'missing' portion then cut around it so that it matched! Now I'm happy with it. I added some red gems to the stars on the cut then adhered it to the embossed panel (the card base is made in exactly the same way as yesterday's by the way) with foam pads.
Carts used:
Tree- Trim The Tree Seasonal cart
Thanks for dropping by!
Heather xxx

22/11/2010

Ring out the bells tonight.......


Crikey! This card is SO simple and quick! I made a couple (I'll show you the other one tomorrow). The only thing that takes time is getting all the ruddy bits out of the cut! This one wasn't too bad- but tomorrow's-don't even go there!
I used pearlised card throughout for this card, except for the blackout behind the bell which is mirri. I cut a piece of pearlised card slightly smaller than the card front, then matted it onto gold pearlised card and adhered it flat. A smaller white panel was cut, run through a Cuttlebug folder, then matted again onto more pearlised gold card. This piece was adhered with foam pads. A trim was made for the embossed panel with some foiled paper on a punched border wrapped with sheer ribbon. The bell was cut from champagne coloured pearlised card, then the blackout was cut twice from 2 colours of mirri. I cut the bow section off the red bell and adhered it to the complete gold blackout bell, then adhered the pearlised bell to it. The bell was then adhered to the embossed panel with foam pads. Simples!! A sheer bow and some gems on the stars on the bell complete the card.
Cart used:
Bell-Trim The Tree Seasonal Cartridge
ps You need the patience of a blummin' saint with this cart but it's worth it!
See ya later!!
Heather xxx
pps It's not Sunday (date at top of post) it's 7am on Monday!

21/11/2010

Oh so classy.......

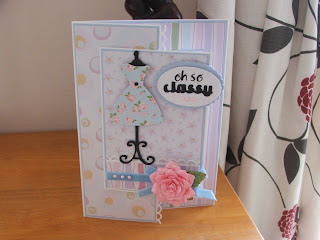
I've got another 'non-Christmas' card for you today. This one is a shortfall card (the front is narrower than the back) I cut the front of the card to 3 1/2" and punched the edge with an EK Success punch. I then matted some paper from Design Objectives Born To Shop, Bubbles A4 pad onto blue card and adhered it to the inside back and the front of the card. I then cut a panel of blue card, matted it onto white, then adhered a piece of star patterned paper to the blue panel. This was then trimmed with a punched piece of cardstock with blue striped paper adhered to it. I wrapped blue velvet ribbon around the striped paper and added a bow and a large Prima bloom.
I cut a dress form from black cardstock, adding a dress cut from pink card and rose-patterned paper. The completed form was adhered with foam pads to the left hand side of the panel. I cut a scalloped oval from blue cardstock, added a white oval with the sentiment 'Oh so classy' created with rub-ons (oh so) and black cardstock, then adhered it to the top right of the dress form slightly overhanging the front of the card. A smattering of pearls complete the front of the card.

The inside of the card has a simple piece of white card matted onto blue cardstock for a sentiment panel.
Carts used:
Dress form & dress- Nifty Fifties
Scalloped oval-A Child's Year
Plain oval-George
'Classy'-Forever Young
Thanks for visiting today!
Heather xxx