23/11/2010

Fillagree tree......

Here's the other card made from the Trim The Tree seasonal cartridge, and I can tell you this cut was trouble! I tried glittercard (didn't want to know!) several times I tried mirri card (didn't like the curly-wurly bits!) and had to use a brand new mat (grrrrr!) to get a usable cut. Then the blackout didn't look right- the left hand side of the tree towards the bottom didn't match the right hand side. At first I thought that the cartridge was faulty 'til I looked at the leaflet that came with the cart- it was missing on that too! Well I didn't like it like that and quite frankly couldn't think why it should be like that. So I adhered the blackout anyway and added a piece of mirri to the 'missing' portion then cut around it so that it matched! Now I'm happy with it. I added some red gems to the stars on the cut then adhered it to the embossed panel (the card base is made in exactly the same way as yesterday's by the way) with foam pads.
Carts used:
Tree- Trim The Tree Seasonal cart
Thanks for dropping by!
Heather xxx

22/11/2010

Ring out the bells tonight.......


Crikey! This card is SO simple and quick! I made a couple (I'll show you the other one tomorrow). The only thing that takes time is getting all the ruddy bits out of the cut! This one wasn't too bad- but tomorrow's-don't even go there!
I used pearlised card throughout for this card, except for the blackout behind the bell which is mirri. I cut a piece of pearlised card slightly smaller than the card front, then matted it onto gold pearlised card and adhered it flat. A smaller white panel was cut, run through a Cuttlebug folder, then matted again onto more pearlised gold card. This piece was adhered with foam pads. A trim was made for the embossed panel with some foiled paper on a punched border wrapped with sheer ribbon. The bell was cut from champagne coloured pearlised card, then the blackout was cut twice from 2 colours of mirri. I cut the bow section off the red bell and adhered it to the complete gold blackout bell, then adhered the pearlised bell to it. The bell was then adhered to the embossed panel with foam pads. Simples!! A sheer bow and some gems on the stars on the bell complete the card.
Cart used:
Bell-Trim The Tree Seasonal Cartridge
ps You need the patience of a blummin' saint with this cart but it's worth it!
See ya later!!
Heather xxx
pps It's not Sunday (date at top of post) it's 7am on Monday!

21/11/2010

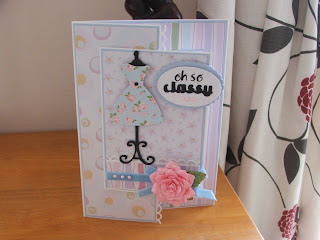
Oh so classy.......

I've got another 'non-Christmas' card for you today. This one is a shortfall card (the front is narrower than the back) I cut the front of the card to 3 1/2" and punched the edge with an EK Success punch. I then matted some paper from Design Objectives Born To Shop, Bubbles A4 pad onto blue card and adhered it to the inside back and the front of the card. I then cut a panel of blue card, matted it onto white, then adhered a piece of star patterned paper to the blue panel. This was then trimmed with a punched piece of cardstock with blue striped paper adhered to it. I wrapped blue velvet ribbon around the striped paper and added a bow and a large Prima bloom.
I cut a dress form from black cardstock, adding a dress cut from pink card and rose-patterned paper. The completed form was adhered with foam pads to the left hand side of the panel. I cut a scalloped oval from blue cardstock, added a white oval with the sentiment 'Oh so classy' created with rub-ons (oh so) and black cardstock, then adhered it to the top right of the dress form slightly overhanging the front of the card. A smattering of pearls complete the front of the card.

The inside of the card has a simple piece of white card matted onto blue cardstock for a sentiment panel.
Carts used:
Dress form & dress- Nifty Fifties
Scalloped oval-A Child's Year
Plain oval-George
'Classy'-Forever Young
Thanks for visiting today!
Heather xxx

19/11/2010

Green Fingers........

Men's cards are always few and far between on blogs that I visit..even mine, I like flowers and ribbon too much and you can't put too much 'frippery' on men's cards can you?...but occasionally, for a change, I'll make a man's card as a challenge more than anything! There aren't too many Cricut cartridges out there that are 'male' related (Sports Mania, Handyman,Dude, Billionaire- PROVOCRAFT PLEASE TAKE NOTE!) and you have to trawl through other carts for something to adapt. I came up with card with elements from an unlikely source (see end of post). The base card is a pop-out stepper decorated with papers from the Dovecraft Woodland Folk A4 pack. I added some knotted 'manly' striped ribbon to the horizontal panel, a wheelbarrow,rake,watering can,garden tools,fence,grass and a handcut flowerpot with a sunflower. The sentiment panel is a piece of ripped cream card mounted onto brown card, bradded at the corners, and the sentiment was created with Cricut generated letters and 'Heidi' rub-ons. The sentiment panel was then adhered with foam pads to complete the card.
Carts used:
'Green'-Lyrical Letters
Sunflower stem-Just Because Cards
Grass & Fence-Paper Doll Dress Up
All other cuts-Everyday Paper Dolls
Thanks for visiting and don't be scared to leave a comment!
Heather xxx

18/11/2010

From The Heart......


I'm just loving these Prima roses at the moment (what's not to love?!) and I'm using this particular arrangement quite a lot. There isn't too much to this card because the paper is so pretty. The side panels have no embellishment on them as the paper alone is too pretty to cover up! I just added some glitter randomly. A EK Success Chain border punch was used for the horizontal panel, I just added some lilac ribbon across the centre of the ribbon, a bow to one side & white pearls to the other. The shaped panel was cut from more patterned paper with a lilac shadow then adhered with foam pads to the large centre panel. I added an arrangment of Prima and Wild Orchid Crafts roses and some pearl sprays (also WOC). The sentiment was cut from Purple glitter paper and adhered flat. A smattering of white pearls complete the card.
Carts used:
Shaped panel- Winter Woodland
Sentiment- Stamping Solutions
Thanks for dropping in!
Heather xxx

16/11/2010

Never Give Up......


My Christmas card making has come to a halt (except for additions to my workshop samples) as I've been busying myself with general greetings cards. For this card, I used the floral spray in the corner of the front panel as inspiration. The papers are by DCWV and I used two papers, the pale blue floral paper and aqua polka dot for the other panels. All the panels were matted onto chocolate brown cardstock then adhered with foam tape. I added brown polka dot ribbon to the long panel along with a gorgeous Prima bloom. I cut vines for the side panels (one with Flip function enabled) and added brown glittercard flutterbys and punched flowers with gem centres. I added another flutterby to the centre panel along with the glittercard sentiment which was shadowed with more brown card. The sentiment was adhered with foam pads. The punched edge of the centre panel was created with an X-Cut border punch.
Carts used:
Sentiment-Wall Decor & More
Vines-Winter Frolic
Flutterbys-Stamping Solutions
Thanks for visiting!
Heather xxx

15/11/2010

I'd rather be shopping!.....


...Not! I hate shopping! Unless it's for Crafty Stash...then I can shop for England! This card looks pink (must be the light!) but it's actually lilac. The papers are from the new Woodland Folk A4 paper pack by DoCrafts. I used a floral and a teeny polka dot print (which is double sided) The card base is a pop-up stepper. I adhered matted polka dot paper to the side and horizontal panels and matted floral paper to the large centre panel. I used the reverse side of the polka dot paper (which I embossed) to make further, smaller panels which were adhered with foam pads. I downloaded a picture of credit cards from Google Images,printed them onto glossy paper, cut them out and adhered them to the side panels with foam pads. The bag was cut from floral paper with pink mirri card trim. The sentiment was cut from pink glittercard with a purple shadow. This was then adhered below the bag. I added ribbon trim on a punched EK Success border, ribbon bows,layered blooms and a gorgeous Prima flower with some punched leaves to finish the card.
Carts used:
Bag-Doodlecharms
Sentiment-Wall Decor & More
Thanks for visiting today!
Heather xxx