30/08/2010

Out with the old.....


I thought that I'd show you some photos of the opening of our new shop on Saturday...here's the old one, almost empty..... 
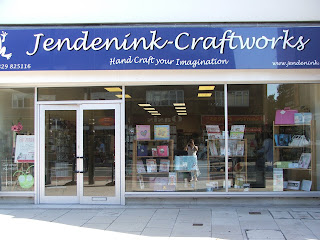
...and here's the new one with it's brand spanking new sign.. don't you love that strapline...'Hand Craft Your Imagination...!!....


..lots of YUMMY papers in the paper racks (pre-opening).....

...a break for lunch......


..Jennie in the shop doorway ready to welcome the first customers.....


..open and getting busy......


Sharon, our registered Pergamano teacher at her Make & Take......


...and Beccy from Do-Crafts demo-ing their fantastic Christmas Range...
We had a fantastic, succesful day! We had lots of new customers who were delighted that a craft shop had opened in Fareham. Our loyal Stubbington customers came in too...we really appreciate their loyalty, it makes what we do worthwhile! Thanks everyone for making it a great day for us!
I'll be back tomorrow with a C-word card!
Heather xxx


27/08/2010

P.s .... I love you......


Don't you just lurve red and black together on a card? It makes for a very dramatic (and it has to be said!) sexy end result! I got this fab paper on sale at The Range in Gosport..it's called 'Paris Nights' by g.c.d. The black script paper is in french..ooh la la! I hadn't a clue what to put on this card- I'd put the ribbon and flower on but couldn't decide whether to put a phrase or an image on it. So I trawled through my limited selection (yeah right!) of carts and came up with 'PS. I love You' which I thought would go rather well. So I cut it out from red glittercard and black mirri, layered it up, adhered it with foam pads, added 3 miniature roses...et voila!.. finis! I decorated the inside with a punched border and matted sentiment panel embellished with 3 punched hearts.
Carts used:
Sentiment- Wall Decor & More
Have a great weekend all... we open the new Jendenink Craftworks tomorrow. We've (especially The Boss-Jennie) have been running around like the proverbial wotsits in an attempt to get the old shop stripped and the new one stocked..It's been bonkers at times but as far as I know we are set to go. If any of you are around in Fareham tomorrow morning (Saturday 28th) please drop in. We open at 10am and will have a cardmaking demo by someone from Do-Crafts and, people, you'll think you've died and gone to Heaven when you see what is on offer!
TTFN and hope to see you tomorrow!
Heather xxx

25/08/2010

Happy Birthday Amber!......


I've made this shape of card before but never posted it because it was for a workshop. That particular card was cut with original bug owners in mind but I made this one using the Expression- and it's JUMBO, people!! The card was made for the youngest daughter of some very good friends of ours who was 16 yesterday.I cut it at 7 3/4" twice (Shadow/blackout) and adhered the two pieces together down the left hand side (you can see this clearly in the second photo). I cut another phone shape in green polka dot paper (DCWV) and covered the base card with it. A phone (layer) cut from floral paper (DCWV) was adhered over a silver mirri base cut and a screen cut from more mirri was adhered to the floral paper. I punched a hole with a Cropodile in the top left corner of the phone and inserted an eyelet. Assorted beads and a handbag charm were threaded onto a piece of fine silver cord, threaded through the eyelet and secured at the back. The phone was then adhered to the card front with foam tape. Black letter stickers ( yes.. I know!) were applied to the screen to spell 'Happy Birthday!' and number stickers were applied to the key pads. I cut 'Amber' from glitter card with a silver mirri shadow and adhered the letters at an angle across the card front with foam pads. A layered bloom and a flower-shaped gem complete the card.
Carts used:
Card base & mobile phone- Paisley
Amber- Ashlyn's Alphabet (Base font)
Thanks for dropping by!
Heather xxx

24/08/2010

Happy Birthday shaped duo.....


First of all I'm so sorry about the terrible photo of the 1st card, but I really wanted you to see it and I'm afraid that this photo was the best of 3! I made these cards for my SIL Lisa and niece Terri who both had a birthday on Monday. I used the same shape of card but Terri's card was more squat than Lisa's. They were both made in exactly the same way using DCWV papers. For Lisa's card I added lippy and nail polish embellies and for Terri's a pair of leather-look killer heels! Some layered blooms and pearls finish the cards.
Carts used:
Card bases- Winter Woodland
Shoes, lippy and nail polish- Forever Young
'Terri' & 'Lisa'-Winter Woodland
'Happy Birthday'-Calligraphy Collection
Thanks for looking!
Heatherxxx

23/08/2010

'Mr & Mrs' shaped card.....


My cousin, Philip, got married to Jaqui a couple of months ago. They were married abroad but had a party on Saturday for all their friends and rellies who couldn't make the actual nuptuals. Here is the card that I made for them...better late than never! I used the same shaped card base as yesterday's card and the same paper as the post previous to that. I cut the centre from the matted panel and added a scalloped oval, also matted in pink. In the centre of the aperture I added 'Mr & Mrs' cut from white pearlescent card shadowed with pink. I adhered a heart-shaped pearl over the heart beneath the 'R'. A large rose, some shimmery, sheer pink ribbon and some pearl strands complete the card.
Carts used:
Shaped card base- Winter Woodland
Scalloped oval- Ashlyn's Alphabet
Mr & Mrs- Sweetheart
Thanks for dropping by!
Heather xxx

21/08/2010

Thinking of you......


Isn't the shape of this card lovely? It's not a standard C5 card cut to that shape, it's actually 2 scalloped 'lozenges' adhered together to make a card base. The shapes were cut at 5 1/2" from plain white cardstock then adhered together with PVA glue down the left hand side (you can also glue across the top to make a tent fold) I cut another lozenge from pink paper and adhered it to the front. Another lozenge with a white shadow was cut and adhered together. An oval frame cut from white card, then embossed, was place onto the blue lozenge, I drew around the inside then cut it out to create an aperture. The oval frame was then adhered with foam pads. Before adhering the panel to the front of the card I cut an oval from contrast paper and adhered it to the front of the card. Then the panel was adhered over it with foam tape. I added a butterfly die-cut (whaaat?!!) and a layered flower. A sentiment cut from pink cardstock was adhered inside the aperture. I actually made this card for my Mum because it was a year ago today (by date - 21st August but yesterday by day- Friday) that my lovely Dad passed away and I wanted her to know that I was thinking of her on what will be a difficult day for her.
Carts used:
Shaped card- Winter Woodland
Oval frame-George
Thinking of you-Stamping Solutions
Thanks for dropping by!
Heather xxx

19/08/2010

Wedding window......


Here's another aperture front card ( I really must find a better word to describe these cards!) this time a wedding card. I used lovely Papermania wedding papers and chose 2 designs. The front of the card was covered with wedding script paper and the apertured front with lovely rose print paper. I added a strip of punched cardstock down the edges of the card and a scalloped, embossed oval around the aperture. The heart was cut from silver mirr (x2) and pink pearlised cardstock. The pink portion was adhered to one silver heart with foam pads, a piece of cord adhered to the back and then the 2nd heart adhered to the completed front heart with foam pads. This was then suspended from the centre top of the oval with a glue dot- don't remove the clear backing from the dot as it will stick to the front of the card when you put it into the envelope. 'Wedding' was cut from more pearlised card and adhered flat below the aperture. A sheer bow, blooms, leaves and pearl sprays complete the front of the card. The inside was completed with a punched border and a simple sentiment panel.
Carts used:
Scalloped oval- Ashlyn's Alphabet
Heart-Love Struck
'Wedding'-Designer's Calendar
Thanks for looking!
Heather xxx